Pools
A pool can reflect a strategic budget plan, representing a different procedure for grant giving and processing. The pool budget amount can be used to allocate to lower levels, which are pool rounds.
This article will guide you through the process of setting up a new pool.
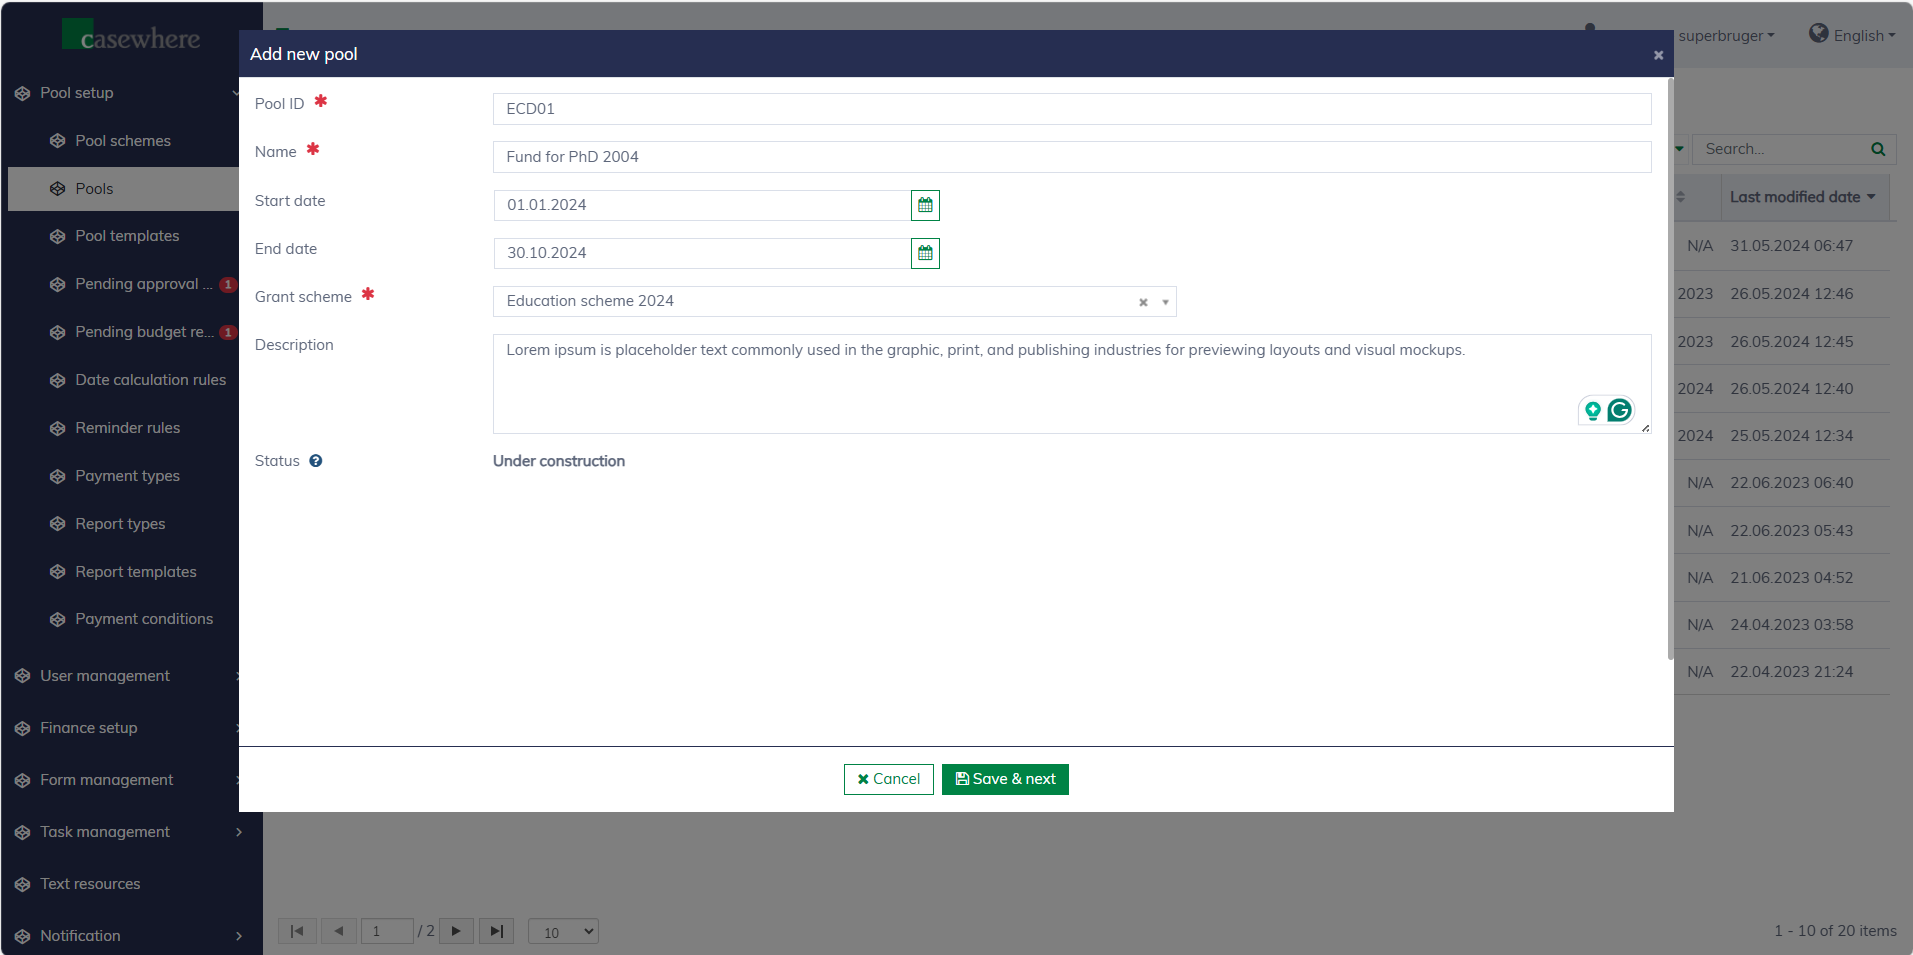
Create new pool
Prerequisite: A pool scheme is created and the scheme budget is available
Navigate to the page at "Pool setup / Pools". Click "Add" to create a new pool.
Please note that you can also create a new pool for a specific pool scheme directly within the pool scheme editor.
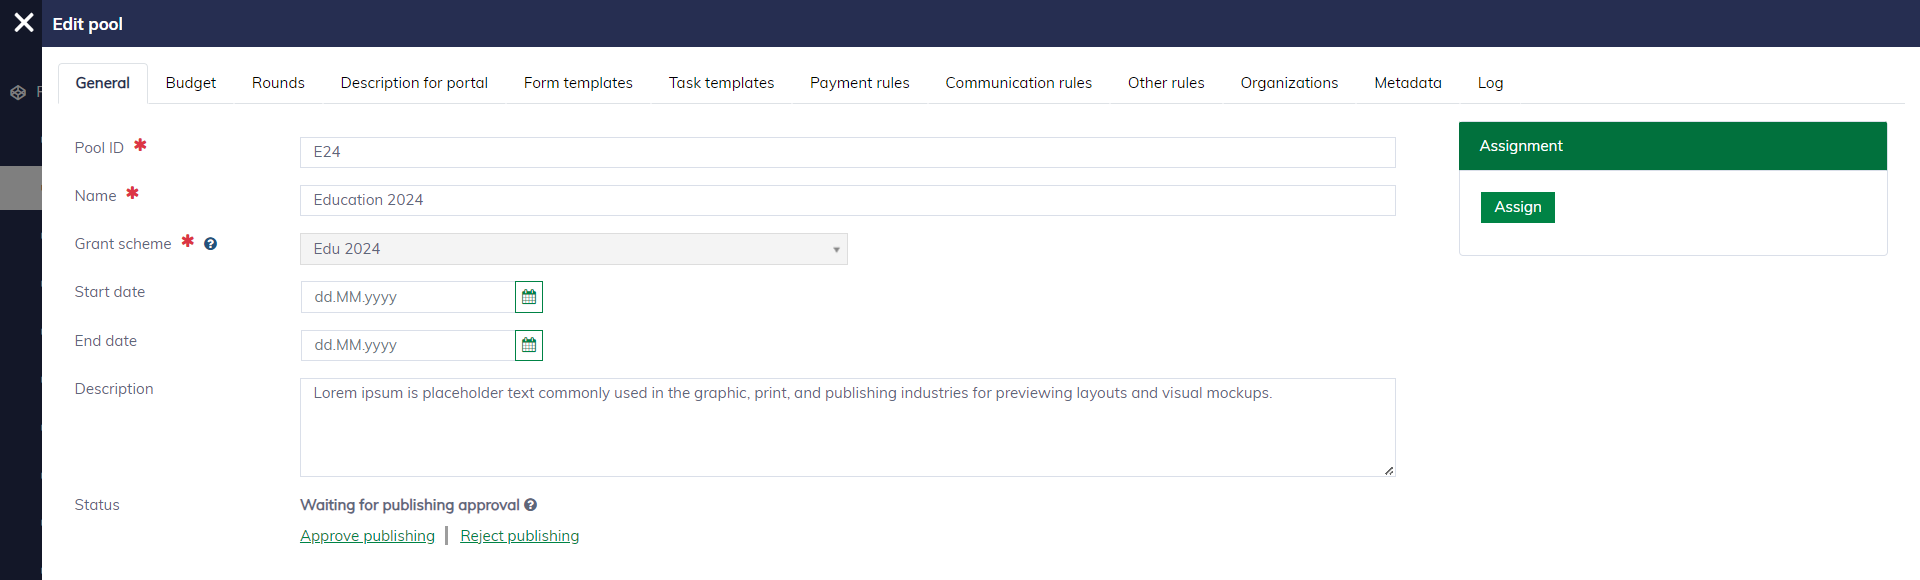
The following fields are necessary for setting up a new pool:
| Field name | Mandatory | Description |
|---|---|---|
| Pool ID | Yes | To identify a pool. Pool ID must be unique |
| Name | Yes | The pool name should reflect the objective of the pool |
| Start date | No | To indicate the lifetime of the pool. This field is for reference only and has no effect on the period when the pool is open for applications |
| End date | No | To indicate the lifetime of the pool. This field is for reference only and has no effect on the period when the pool is close for applications |
| Pool scheme | Yes | To determine the appropriate pool scheme, which will establish the potential budget allocated to the pool |
| Description | No | To provide additional information |
Click "Save & next", a new pool is created and opened in a new editor ready for further setup.
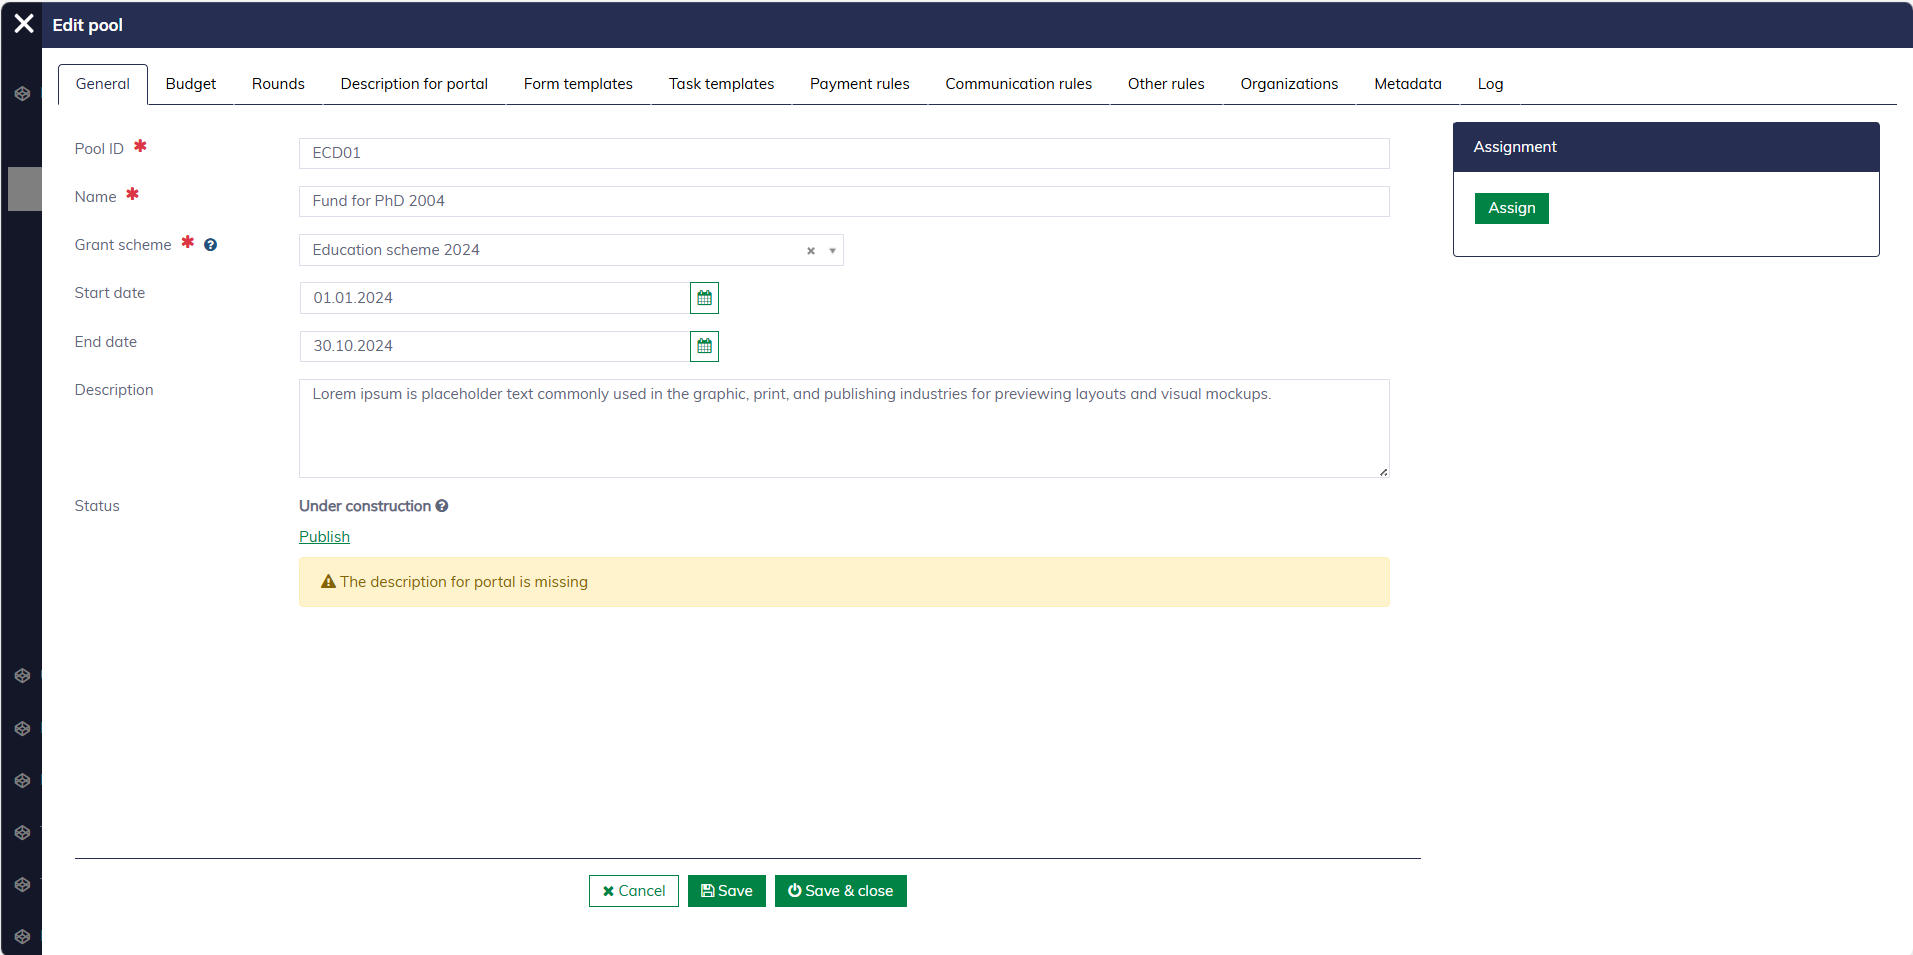
Publish pool
The following steps must be completed to make the pool visible on the application portal.
- Set up pool budget
- Fill in the description for the application portal
- Set up form templates
- Application form
- Decision letters
The status of the pool will be updated to "Waiting for publishing approval". An authorized user can visit the "Pending Approval Pools" page to review and approve it. After approval, the pool will be accessible from the application portal.
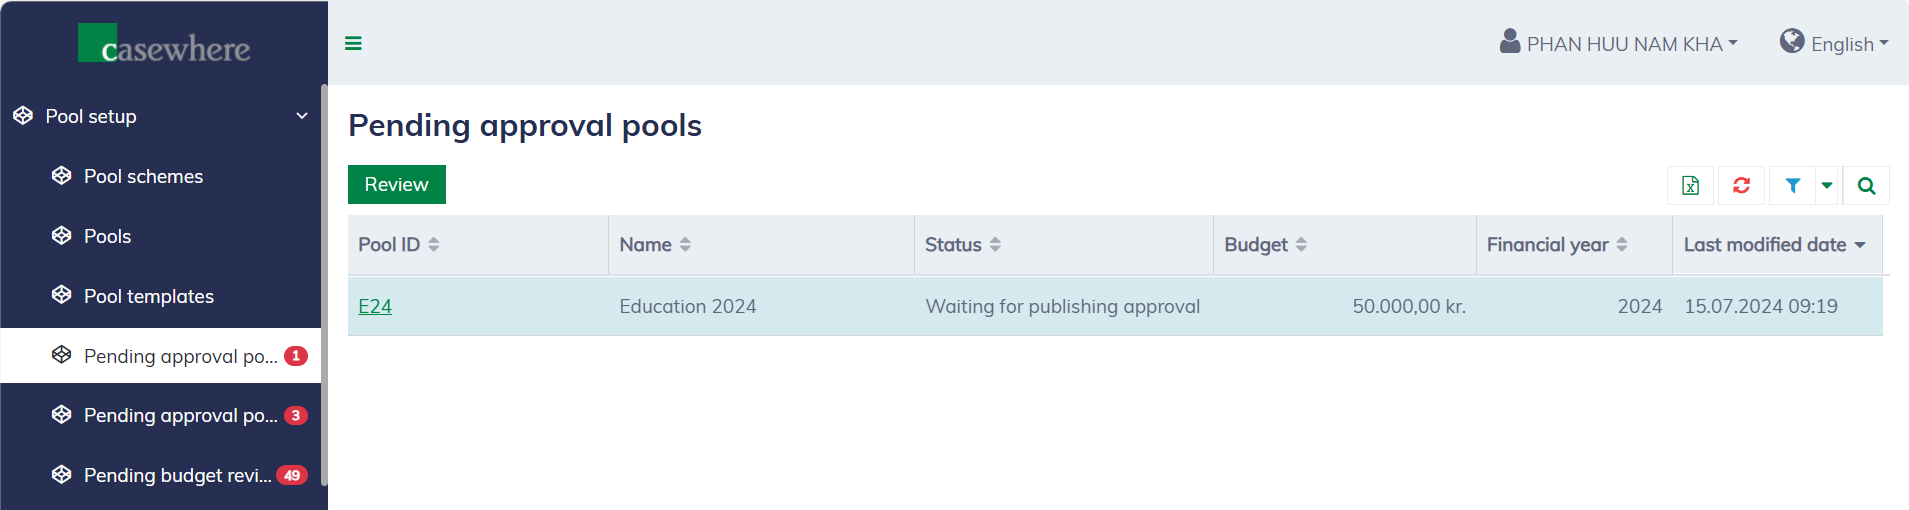
You can click "Review" and make an approval decision:
Set up budget
You can only set up one budget for each financial year. All budget changes require a second approval.
In the pool editor, navigate to the "Budget" tab to start setting up a pool budget.
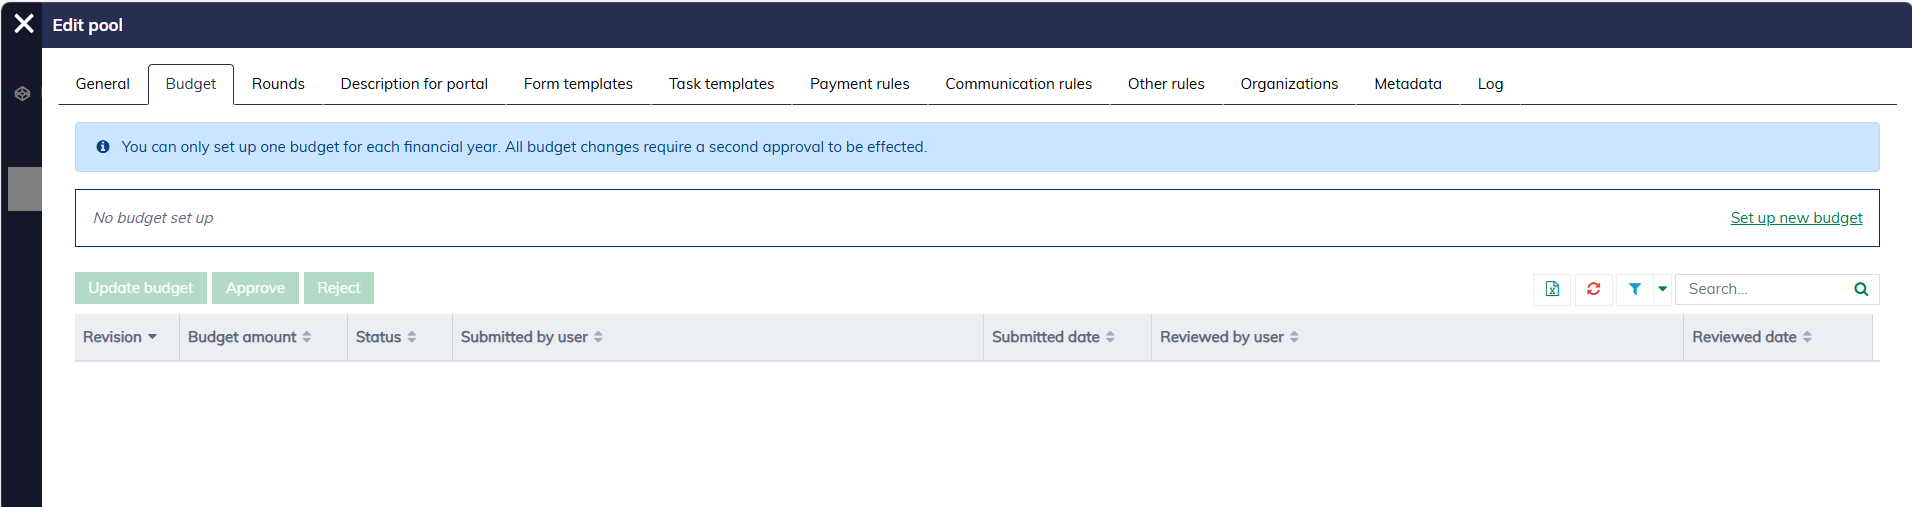
If no budget is set up, click "Set up new budget". The budget editor will appear as follows.
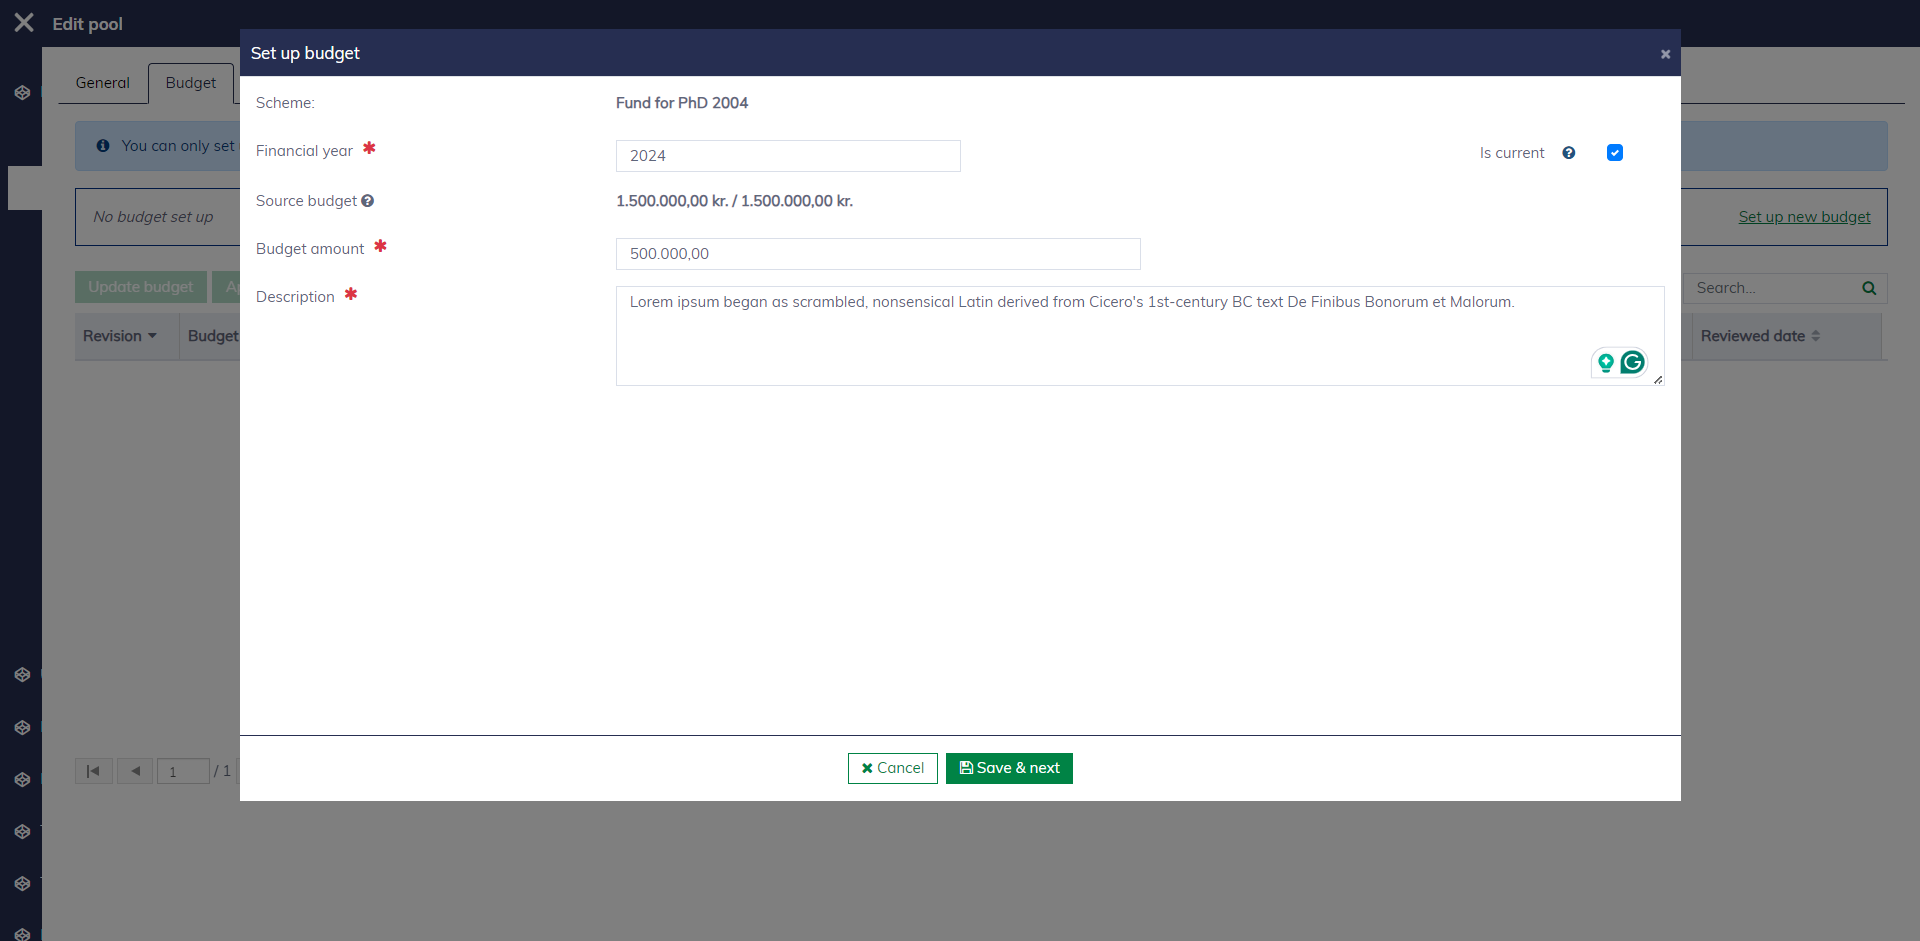
You must fill in the following fields to create a new budget:
| Field name | Mandatory | Description |
|---|---|---|
| Financial year | Yes | A valid year number in the format 'YYYY', for example, 2024 |
| Source budget | Yes | To display the available budget in the pool scheme. This field is read-only and determined by the pool scheme and the pool's financial year |
| Budget amount | Yes | The budget amount must be greater than 0 and less than the available amount in the pool scheme |
| Is current | Yes | To determine if the budget is set up for the current financial year. Technically, you can set up multiple budgets, but there must be only one active |
| Description | Yes | A description is also required to explain the purpose of the budget |
Click "Save & next" to create the budget. The budget must be approved by another authorized person to be effective. Learn more at "Approve budget".
You can also modify an existing budget. To be effective, the change must be approved by another authorized person. Learn more at "Adjust budget".
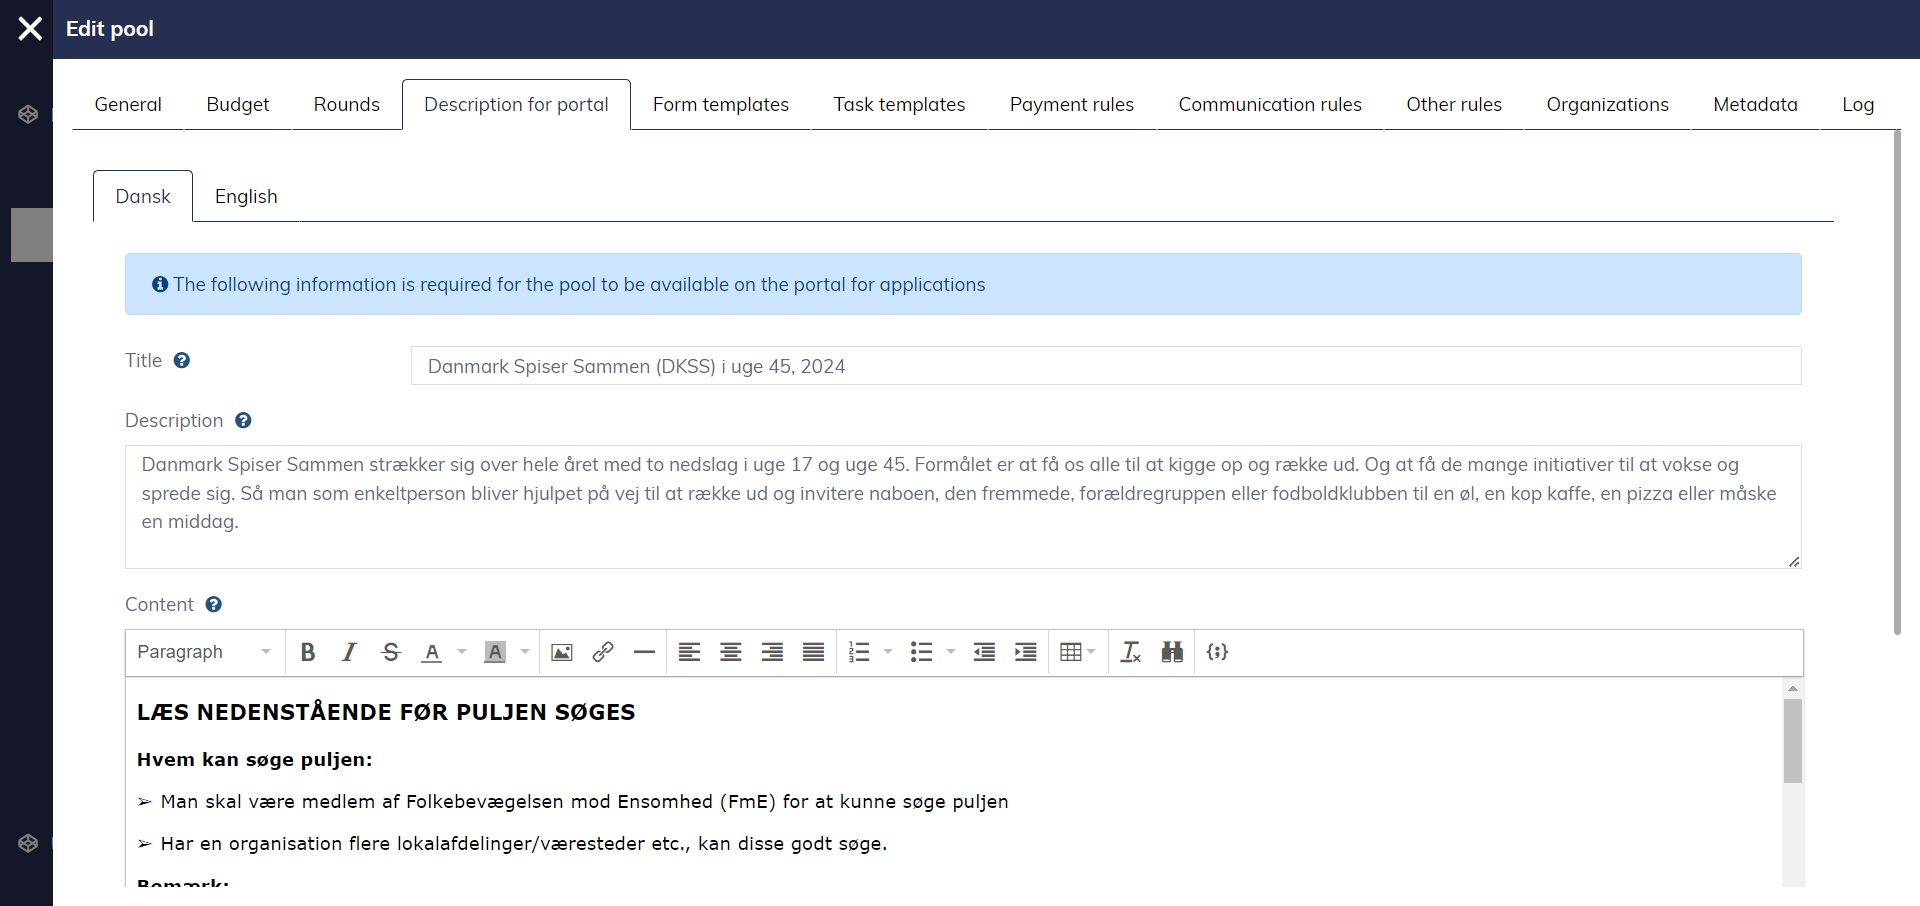
Description for portal
To publish a pool, you need to complete the pool information that will be visible to applicants in the application portal. Navigate to the "Description for portal" tab and fill in the pool title, a short description, and content describing the grant in detail.
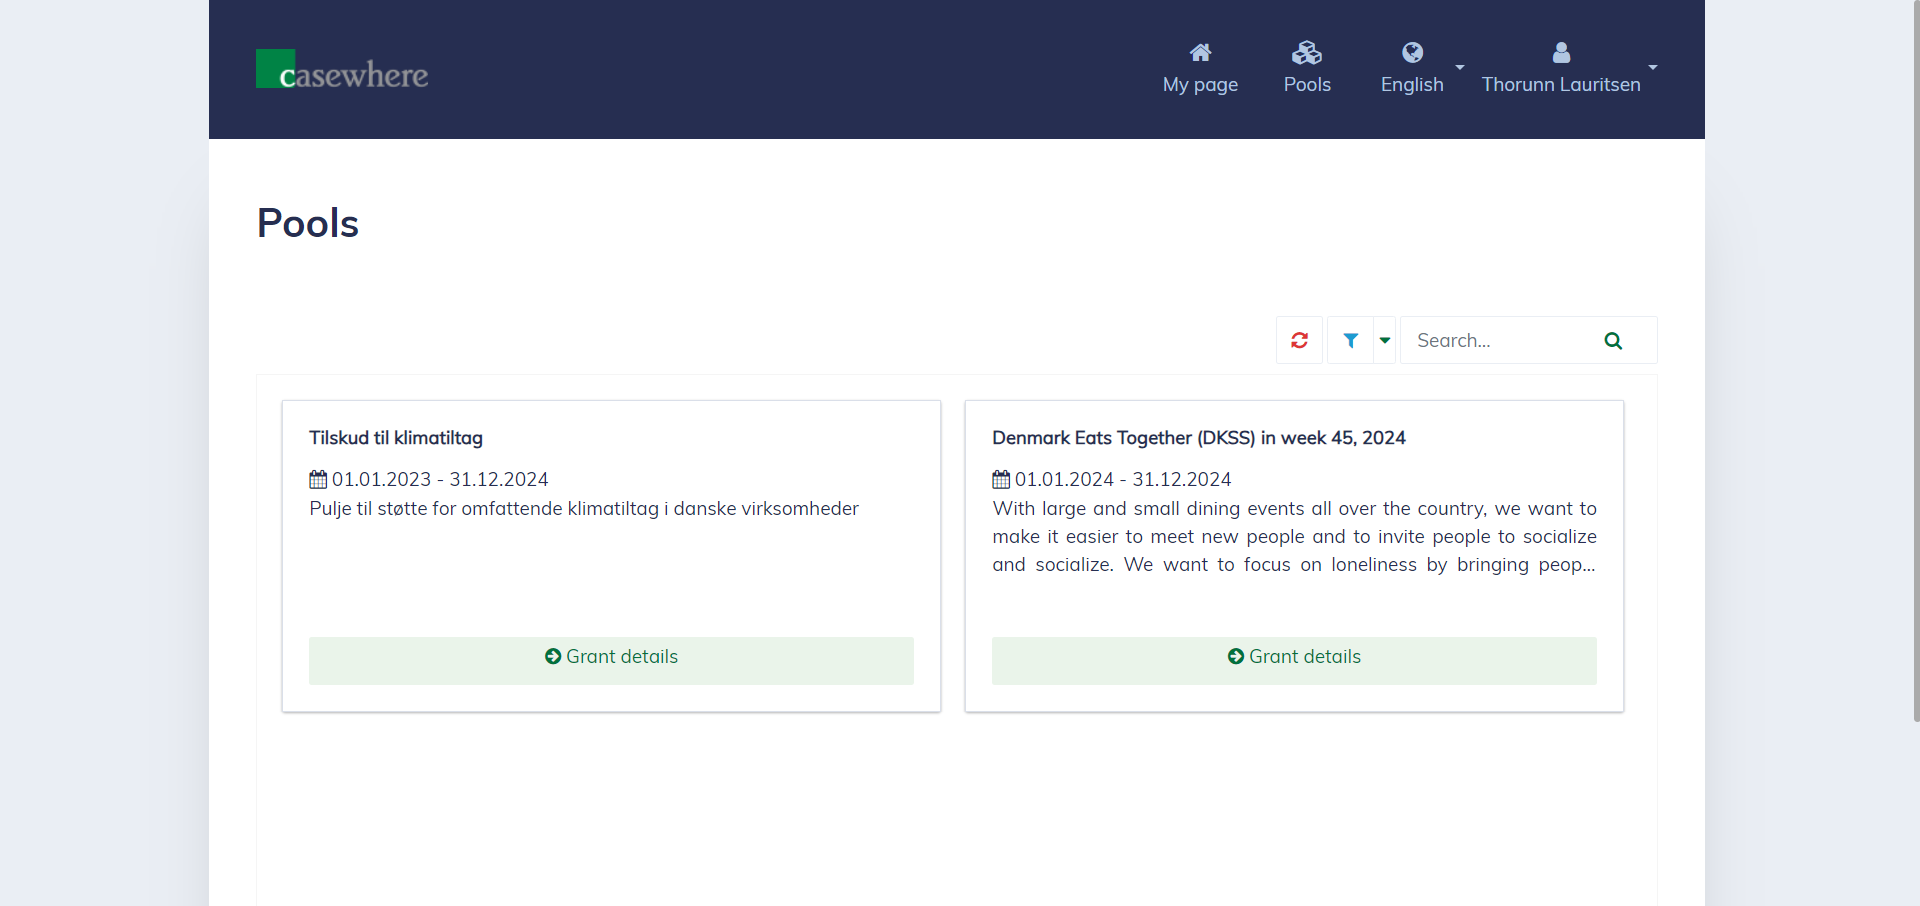
The pools will look as follows in the application portal:
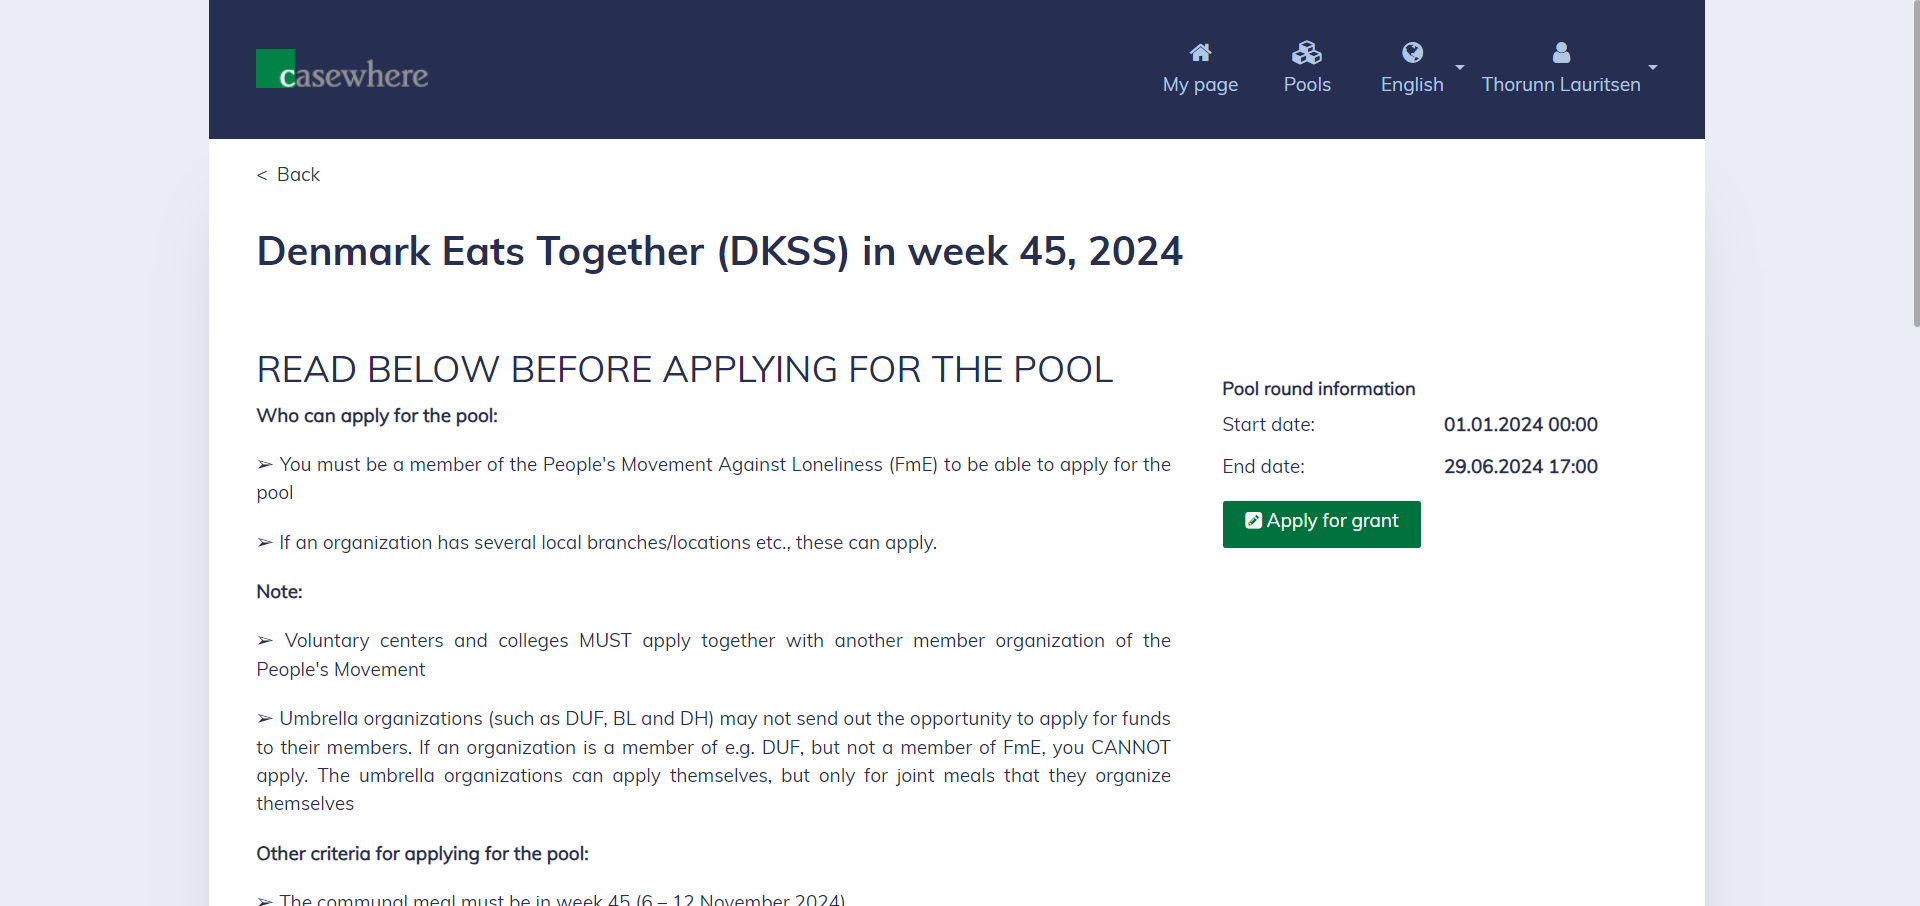
And here are the details about the pool:
Form templates
In the pool editor, navigate to the "Form templates" tab to set up form templates for the pool's operation.
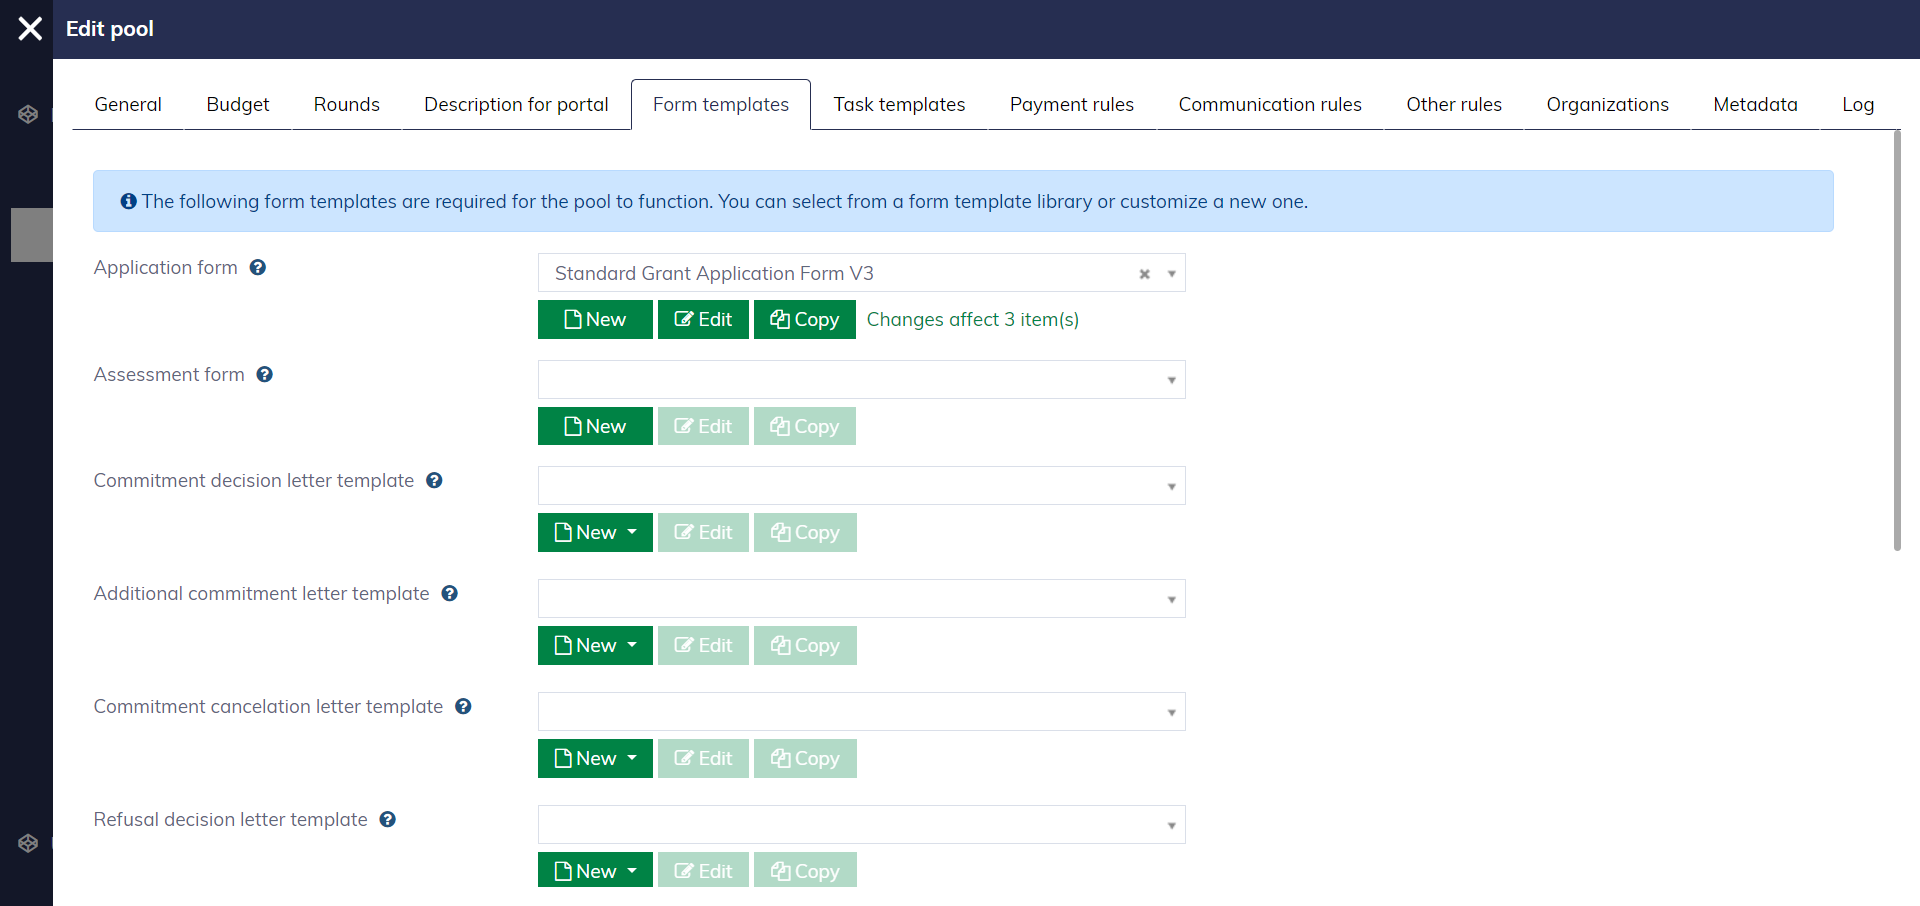
| Template | Template type | Description |
|---|---|---|
| Application form | Webform | Define the application form submitted through the application portal |
| Assessment form | Webform | Define the form that caseworkers will use to assess the applications |
| Commitment decision letter | MS Word | Define the letter sent to applicants if the grant is accepted |
| Additional commitment letter | MS Word | Define the letter sent to applicants when an additional grant is accepted |
| Commitment cancelation letter | MS Word | Define the letter sent to applicants when the grant is canceled |
| Refusal decision letter | MS Word | Define the letter sent to applicants when the application is refused |
| Assessment memo | MS Word | Define the memo containing assessed applications |
| Application receipt | MS Word | Define the letter sent to applicants after they submit their applications |
| Payment letter | MS Word | Define the letter sent to applicants when a payout is made |
| Invoice letter | MS Word | Define the letter sent to applicants when an invoice is issued |
Pool rounds
A pool round must be published so that the pool can accept applications submitted through the application portal. You can do that by navigating to the "Rounds" tab in the pool editor.
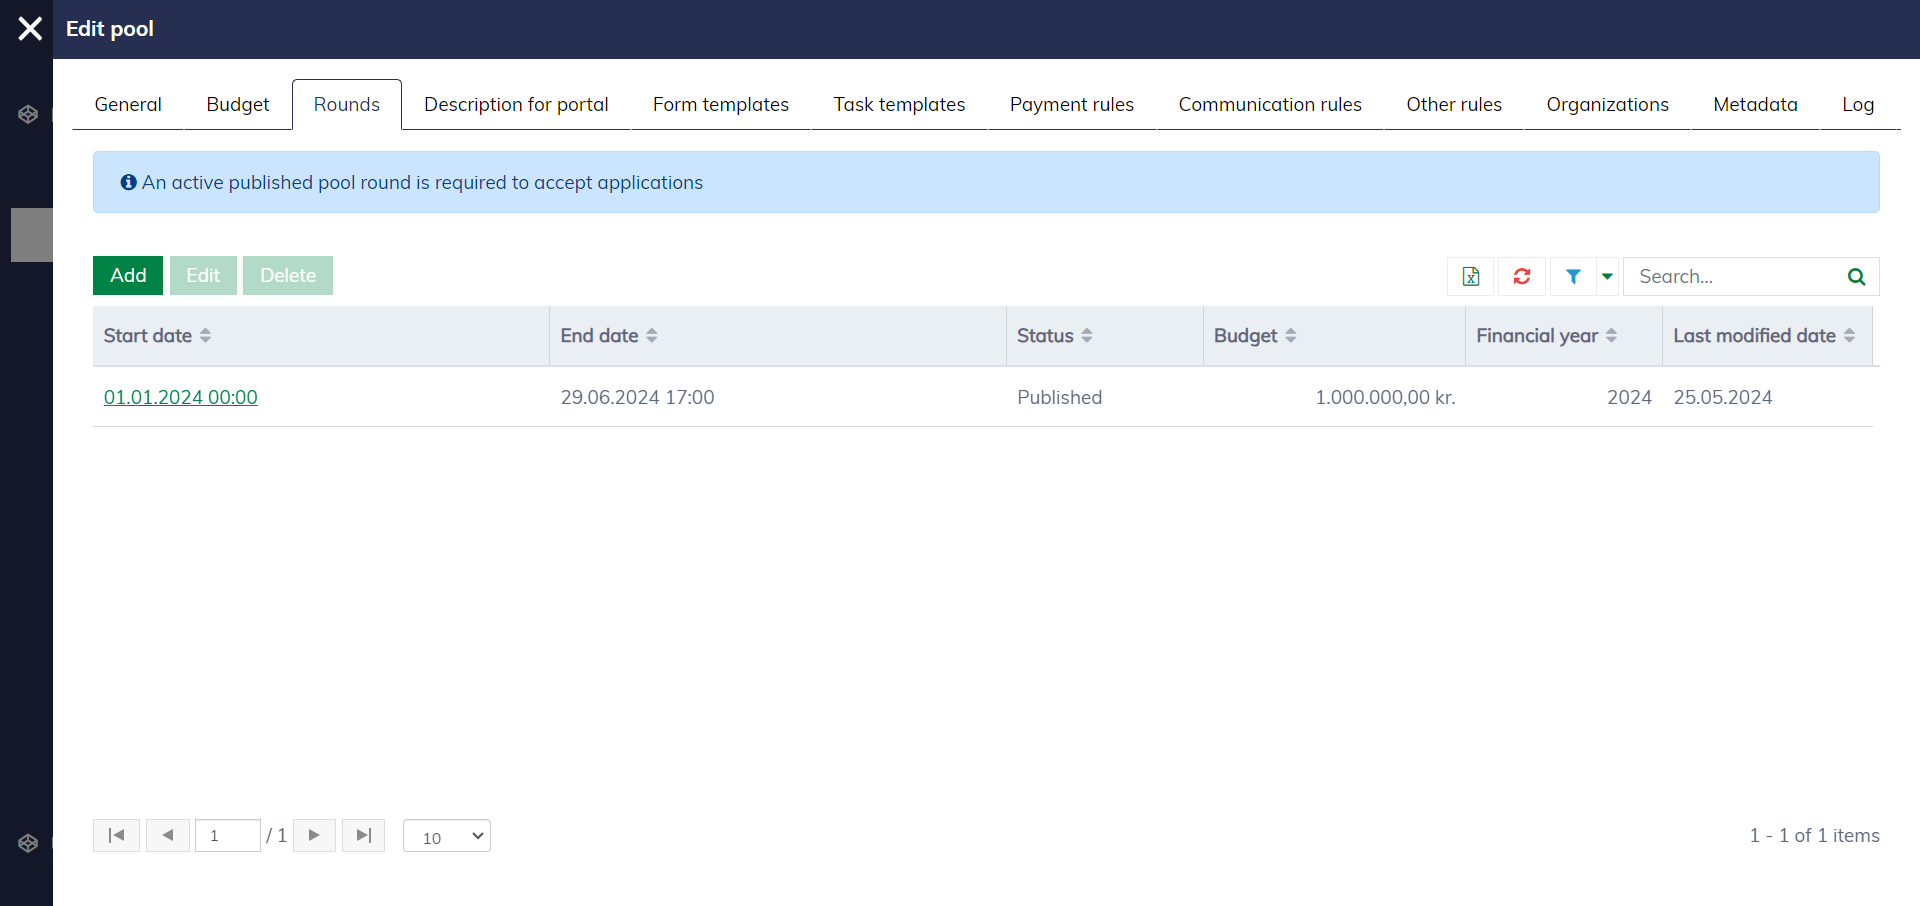
Click here to learn more about setting up pool rounds.
Pool lifecycle
The diagram below illustrates the statuses of the pool and their transitions.
 stateDiagram
 	classDef normalState fill:#DAE8FC,stroke:#6C8EBF
 	classDef pendingState fill:#FFF2CC,stroke:#D6B656
 	UnderConstruction: Under Construction
 	WaitingForPublisingApproval: Waiting for publishing approval
 	Published: Published
 	WaitingForClosingApproval: Waiting for closing approval
 	Closed: Closed
 	Historic: Historic
    [*] --> UnderConstruction: Set up new pool
    UnderConstruction --> WaitingForPublisingApproval: Publish pool (1)
    WaitingForPublisingApproval --> Published: Approve publishing
    WaitingForPublisingApproval --> UnderConstruction: Reject publishing
    Published --> WaitingForClosingApproval: Close pool (2)
    WaitingForClosingApproval -->  Closed: Approve closing
    WaitingForClosingApproval --> Published: Reject closing
    Closed --> Historic: Archive
    Historic --> [*]

    class UnderConstruction normalState
    class Published normalState
    class Closed normalState
    class Historic normalState
    class WaitingForPublisingApproval pendingState
    class WaitingForClosingApproval pendingState
Publish pool (1): Requirements for publishing a pool are described here.
Close pool(2): Requirements for closing a pool:
- All rounds must be closed. For that, all applications must be closed as well.
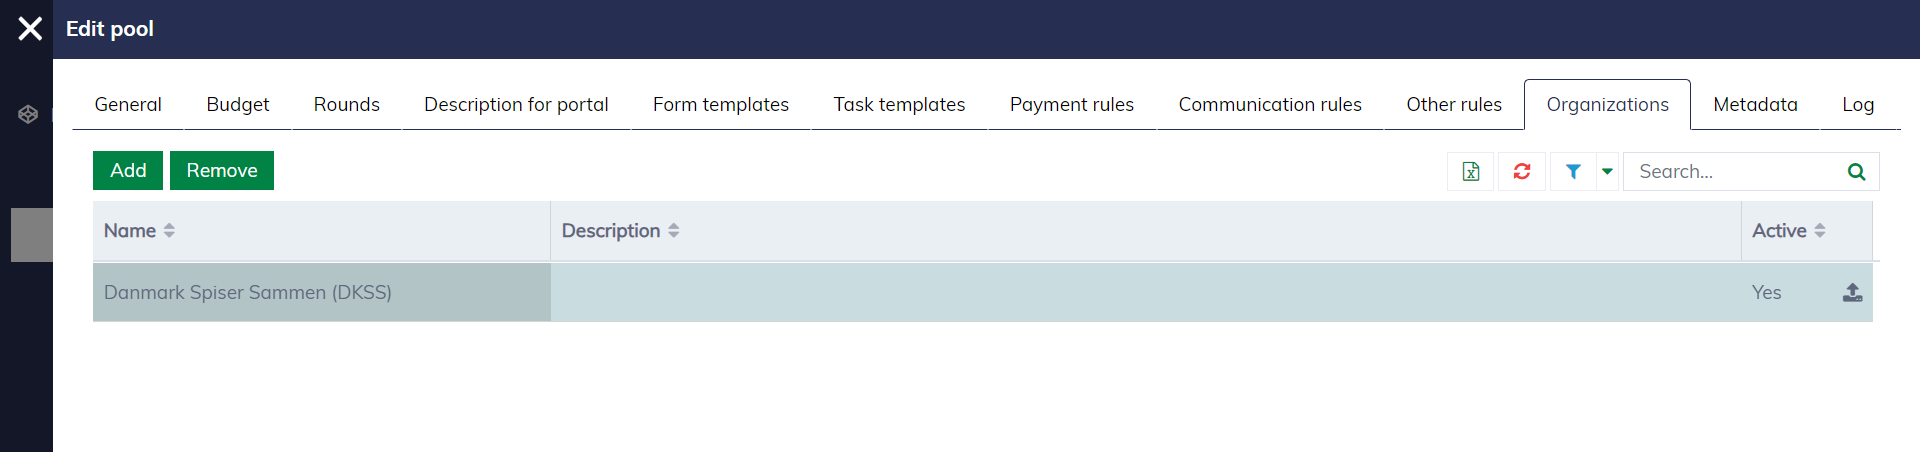
Pool access
The system manages users by their organizations, meaning a user can only access pools assigned to their organizations. That also means a pool must be assigned to an organization to be accessible for caseworkers.
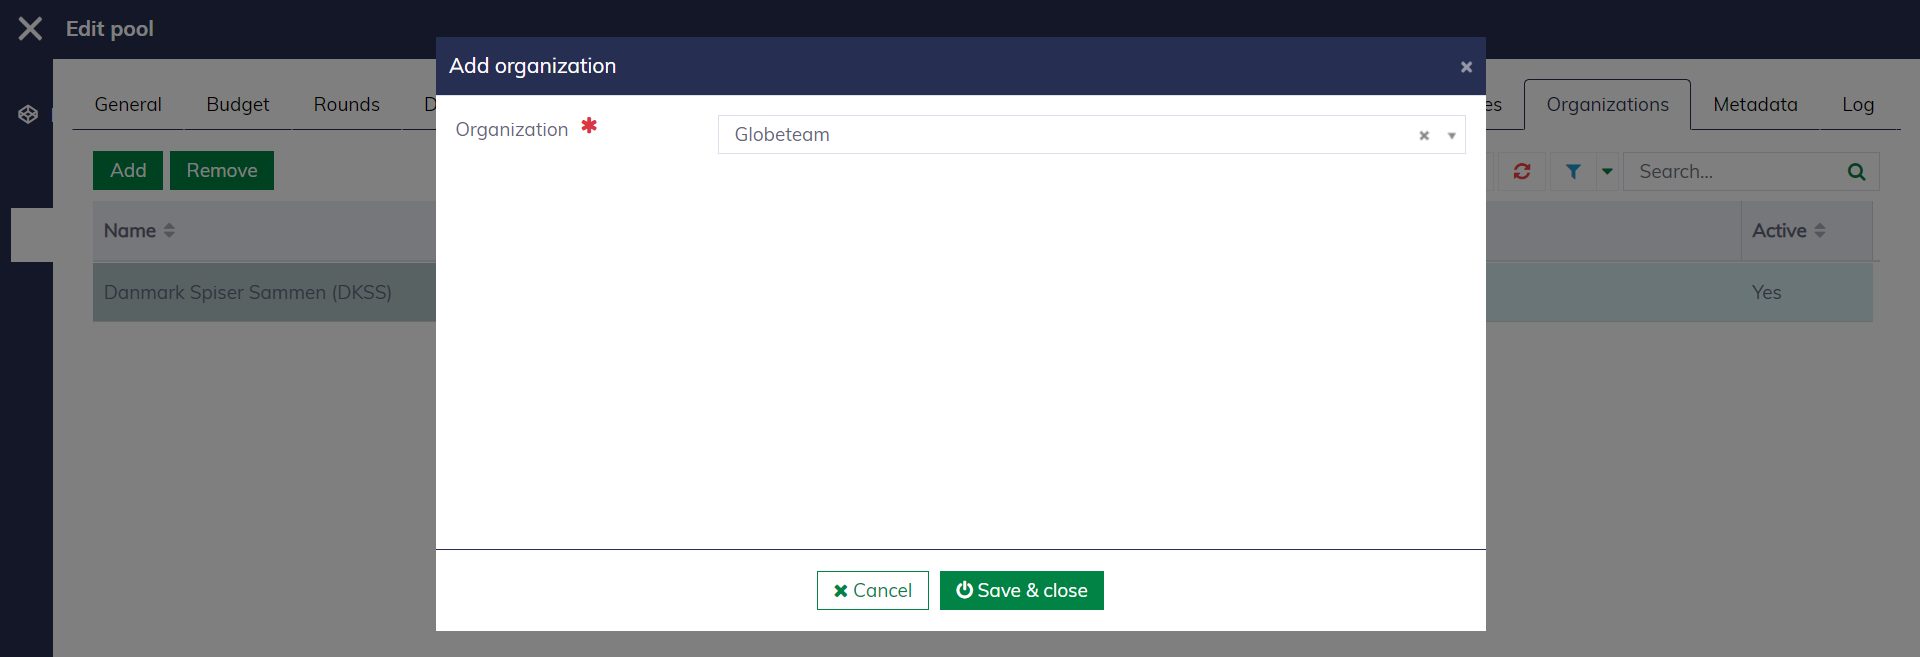
In the pool editor, you can navigate to the "Organizations" tab and assign the pool to relevant organizations.
Click "Add" and select an organization:
Other setup
Task templates
The system provides task management as a tool for organizing work in your organization. You can set up different task templates for different pools.
In the pool editor, you can navigate to the "Task templates" tab to set up task templates for your pool.

Setting up a task requires a couple of steps:
Step 1: General info
Here you can describe what the task is about.

Step 2: Task activity
Here you can configure what the task will do:
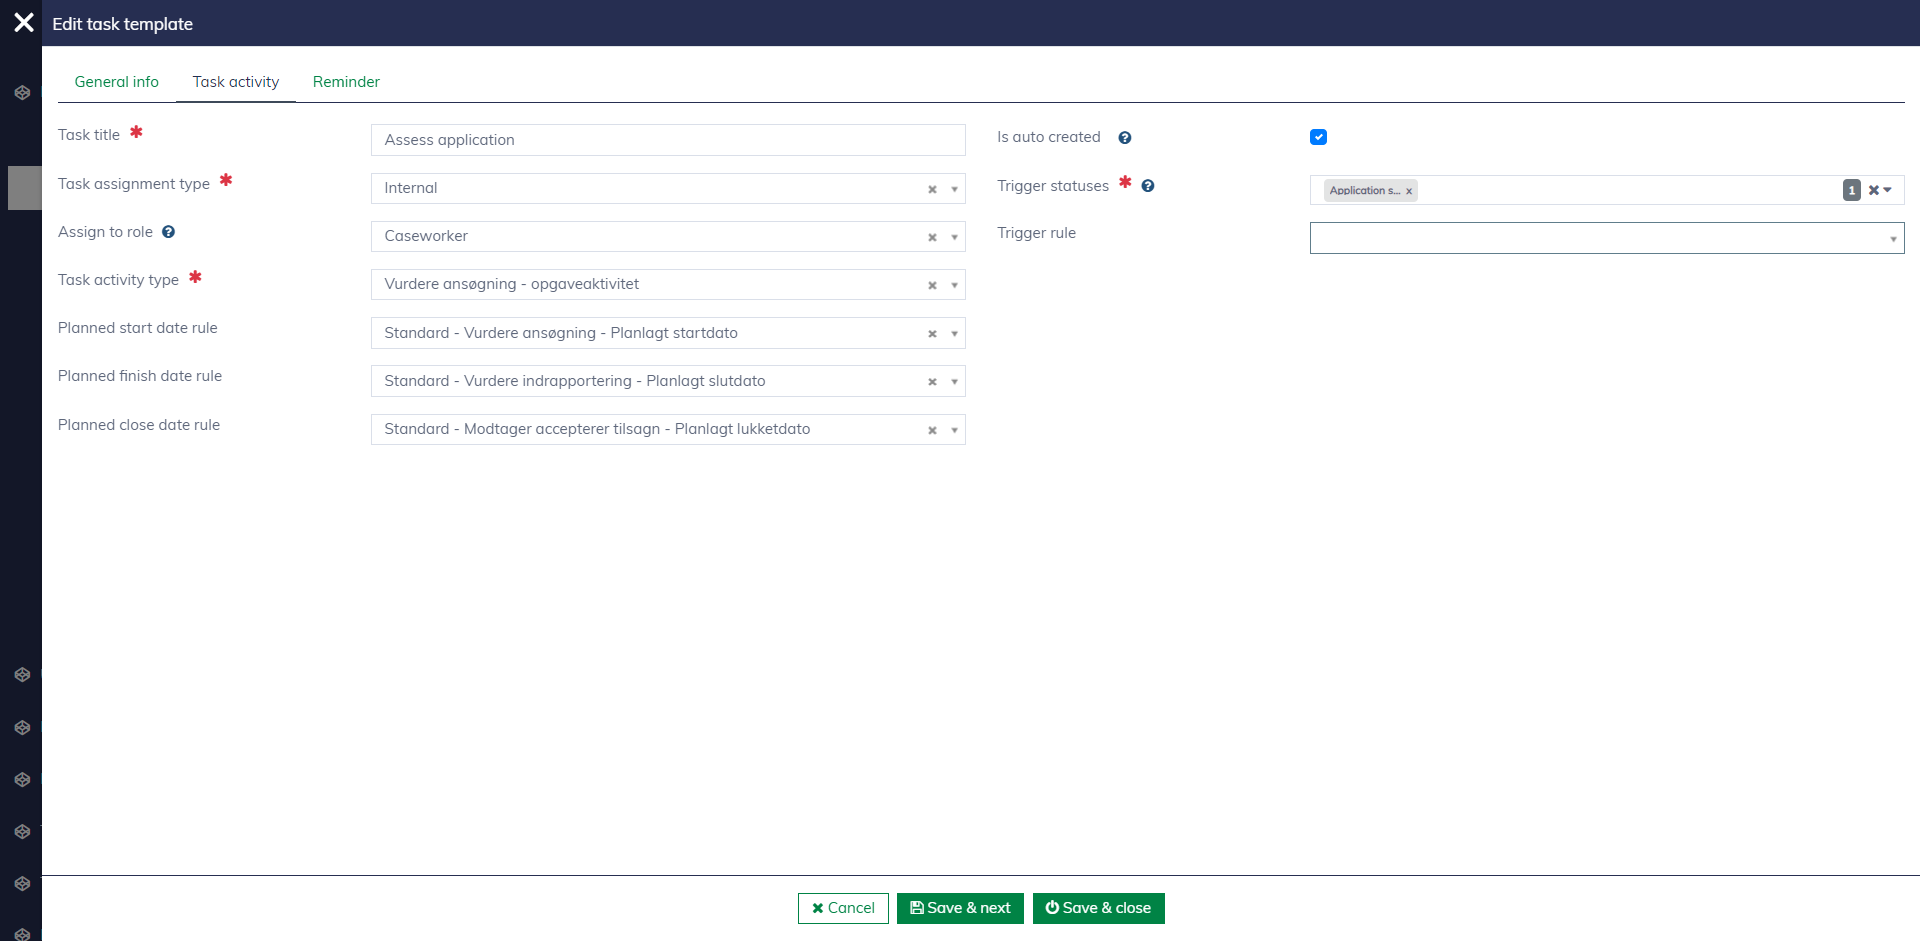
| Field name | Mandatory | Description |
|---|---|---|
| Task title | Yes | The task title will show end users the purpose of the task. |
| Task assignment type | Yes | To determine if a task is assignable to caseworkers or external users. |
| Assign to role | No | If configured, the system will automatically find the caseworker with that role and assign them to the task. The assignable caseworkers must be assigned to the application first. |
| Task activity type | Yes | To determine the activity to execute. The system defines a list of activities that can be integrated into a task. See more here. |
| Planned start date rule | No | To determine when the task should be started. See more about date calculation rules here. |
| Planned finish date rule | No | To determine when the task should be finished. See more about date calculation rules here. |
| Planned end date rule | No | To determine when the task should be closed. After a task is finished, there might be a process to approve the task before it is closed. |
| Is auto-created | No | If enabled, the system will automatically create a task when a certain condition is met. |
| Trigger statuses | Yes, when "Is auto-created" is enabled | To determine the statuses that can trigger task creation. For example, you can configure the system to create a new "Assess application" task whenever a new application is submitted. |
| Trigger rule | No | To finely control the logic of automatic task creation. |
For configuring reporting tasks, learn more here.
Step 3: Reminder
Here you can configure reminders for the task
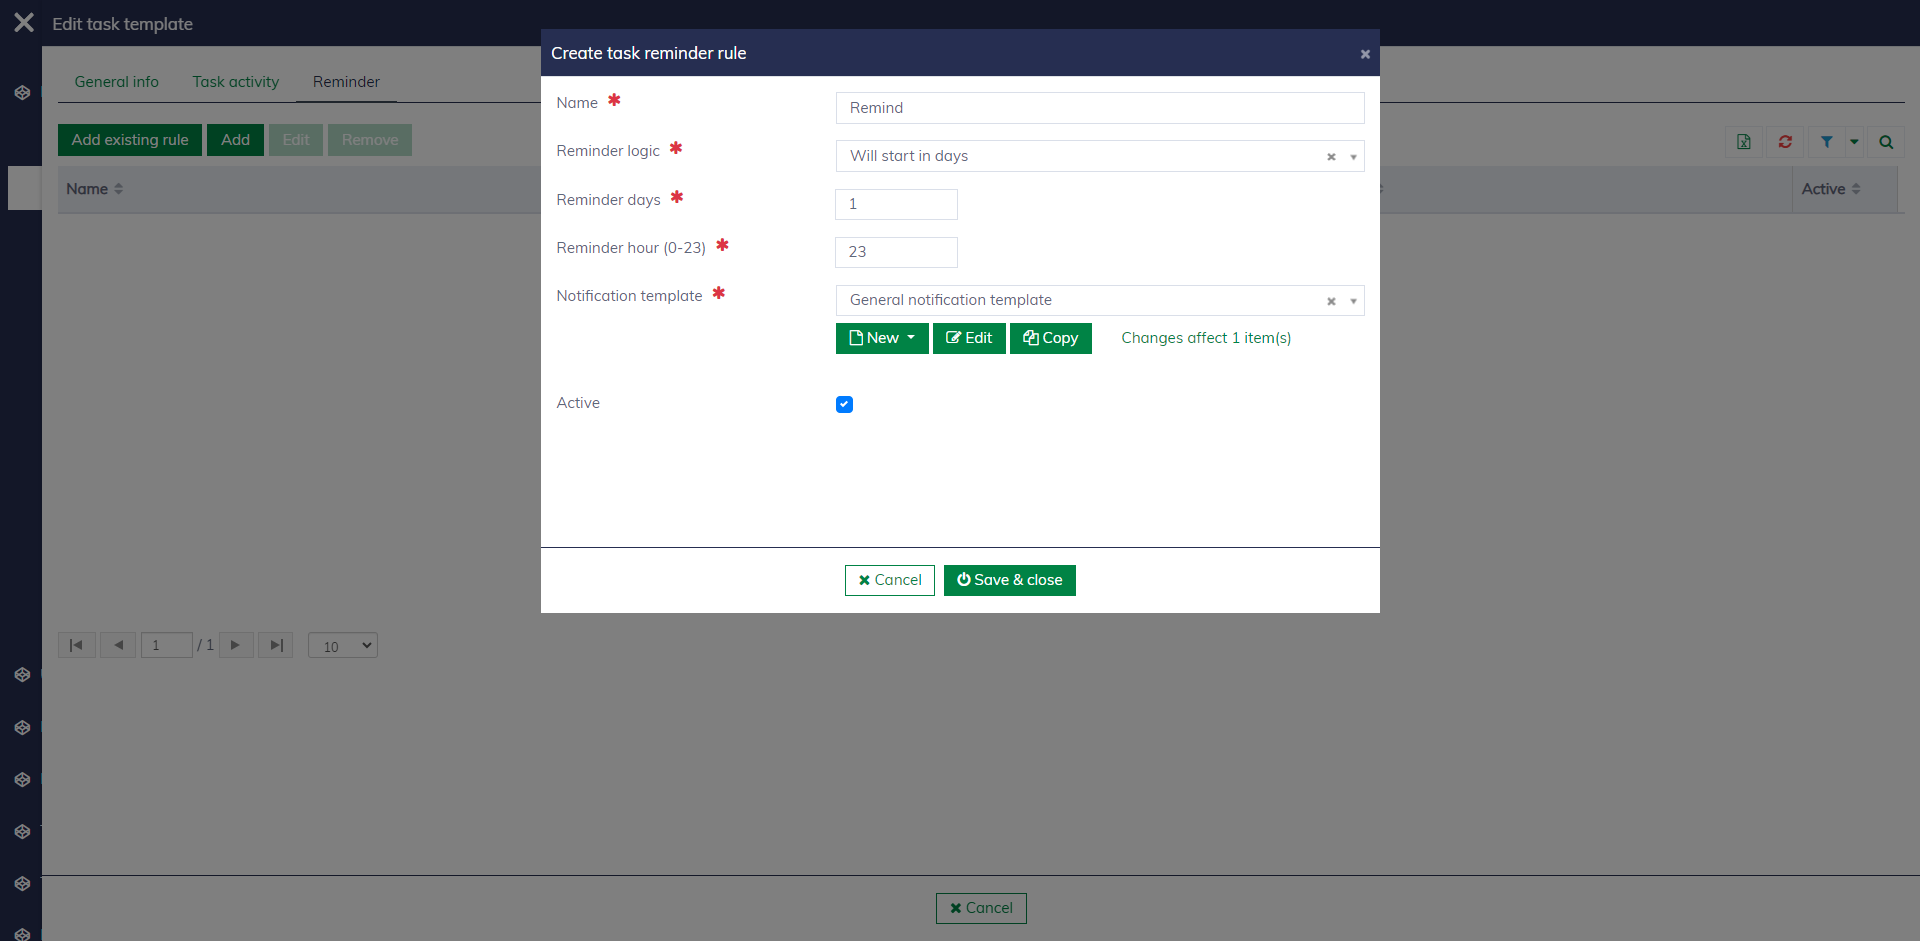
| Field name | Mandatory | Description |
|---|---|---|
| Name | Yes | The name of the reminder should reflect its purpose. |
| Reminder logic | Yes | To determine when the reminder should activate, e.g., before xx day when the task is planned to start. |
| Reminder days | Yes | To specify when the reminder should activate, such as the number of days before or after the task's start, finish, or close. |
| Reminder hour | Yes | To specify the time of day the reminder should activate. The setting accepts a number from 0 to 23. |
| Notification template | Yes | Select the template to generate the notification content sent to users. |
| Active | Yes | To decide if the reminder is enabled or not. |
Payment rules
It's possible to configure rules for quickly generating payment plans for applications.
In the pool editor, you can navigate to the "Payment rules" tab to configure payment rules for your pool.
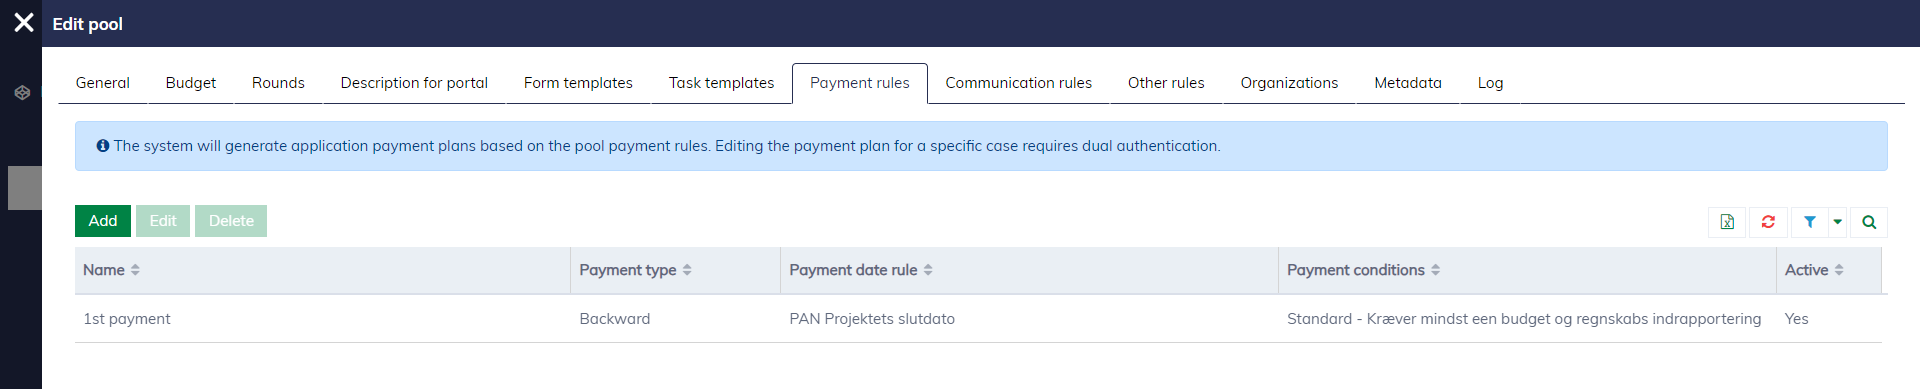
The payment rule editor looks as follows.
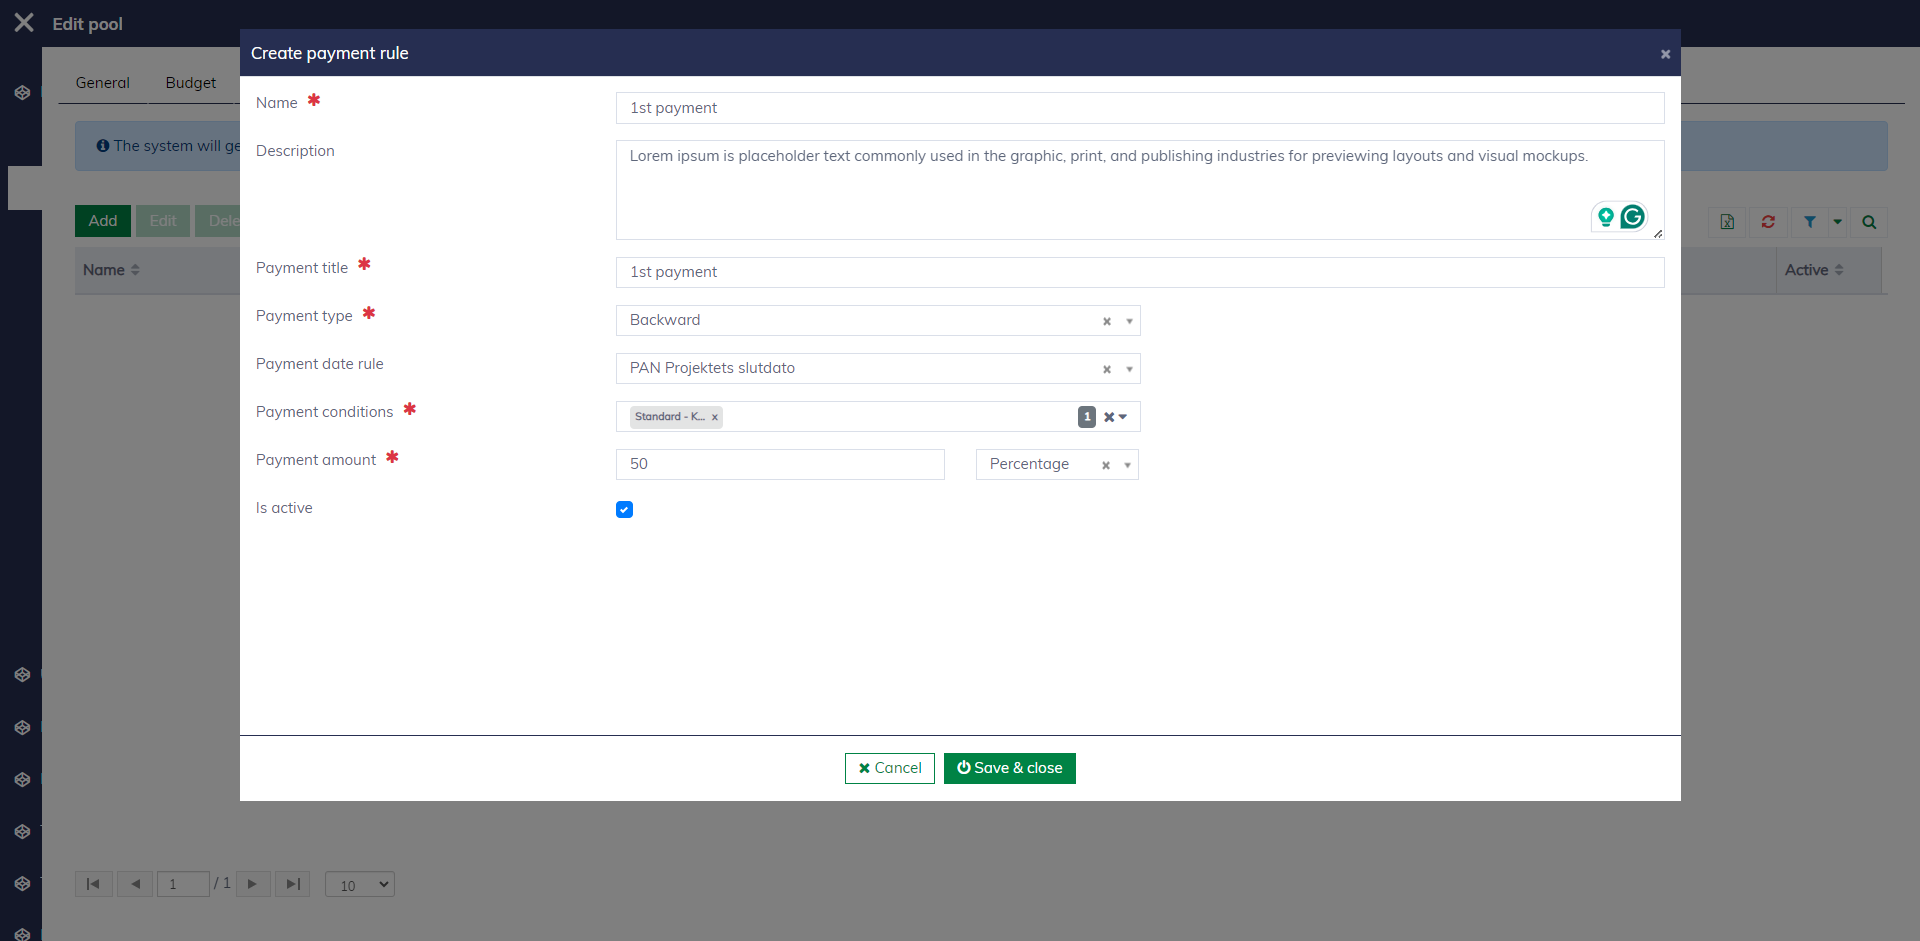
A payment rule has the following fields:
| Field name | Mandatory | Description |
|---|---|---|
| Name | Yes | The name of the payment should reflect its purpose. |
| Description | No | To explain more about the payment. |
| Payment title | Yes | The title of the payment is shown to end users. |
| Payment type | Yes | Select the type of payment. The system allows to define different payment types. See here for more details. |
| Payment date rule | No | To determine when the payment should be executed. See more about date calculation rules here. |
| Payment conditions | Yes | To specify the conditions that set the payment ready to execute. For example, you can configure to activate the payment when the professional report is approved. See here for more details. |
| Payment amount | Yes | It can be a specific amount or a percentage of the committed amount. |
| Active | Yes | To decide if the payment rule is enabled or not. |
Communication rules
It's possible to configure rules in the pool to govern how messages and notifications are sent to users.
In the pool editor, you can navigate to the "Communication rules" tab to configure communication rules.
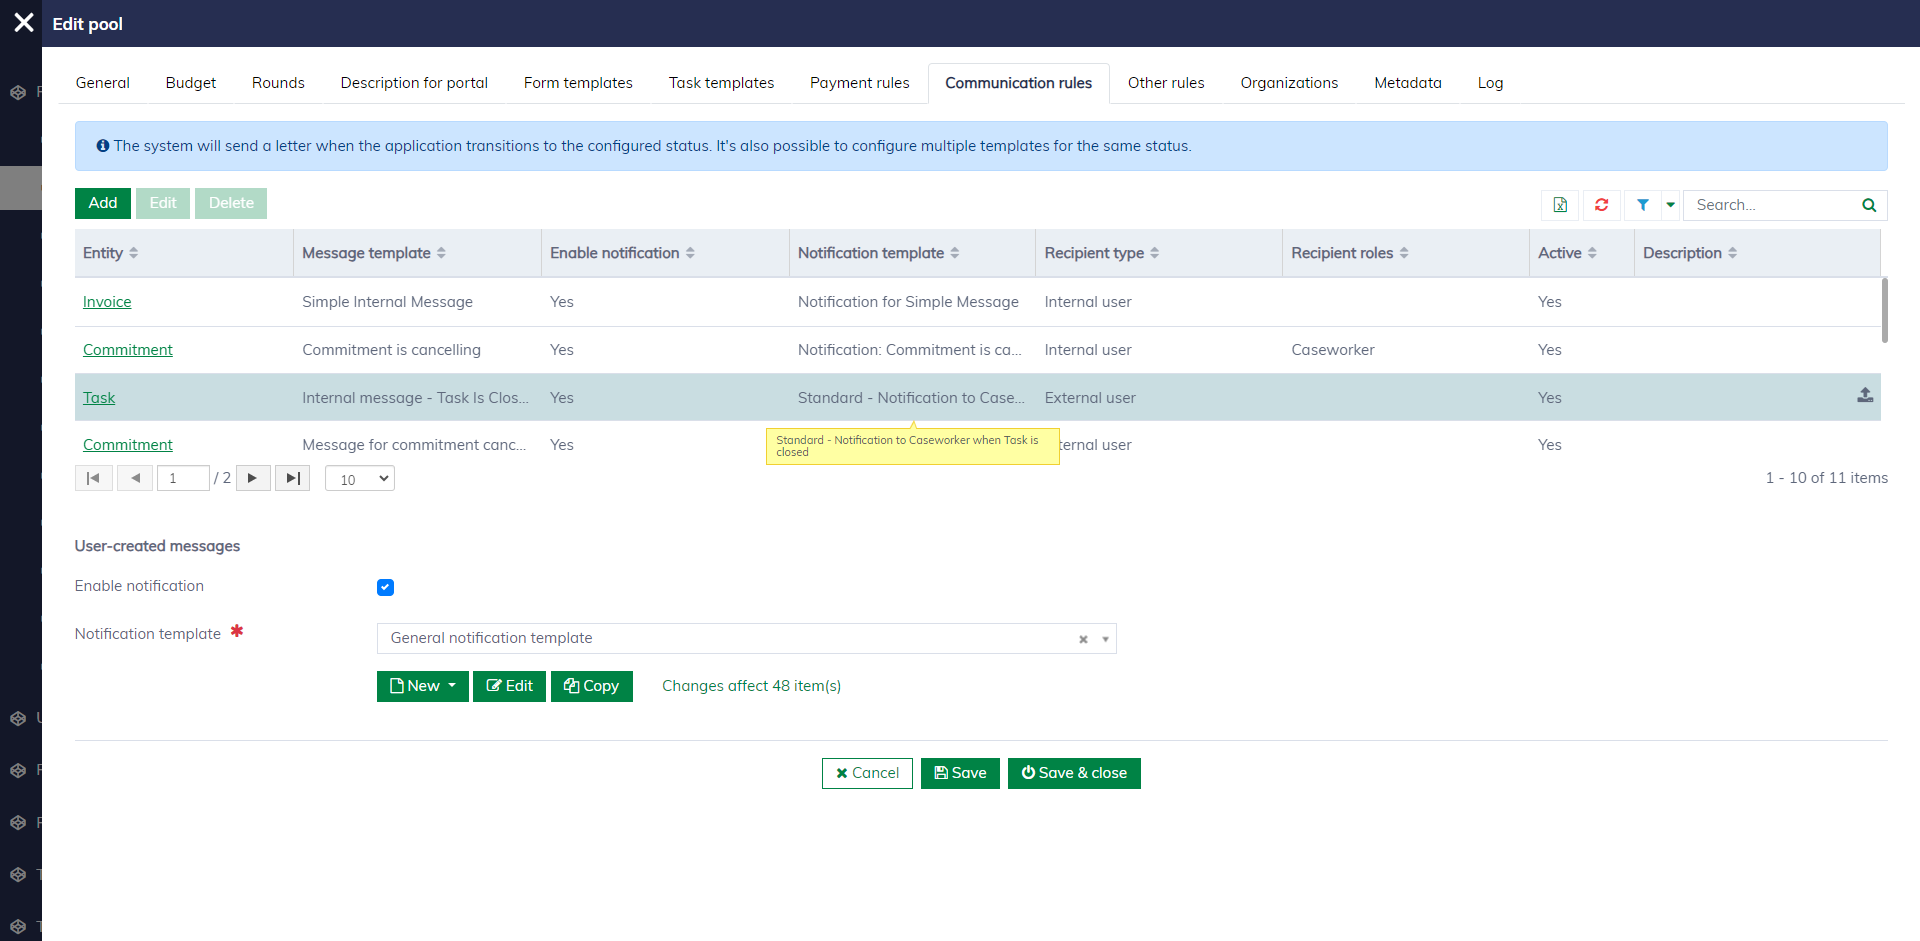
The editor for communication rule looks as follows:
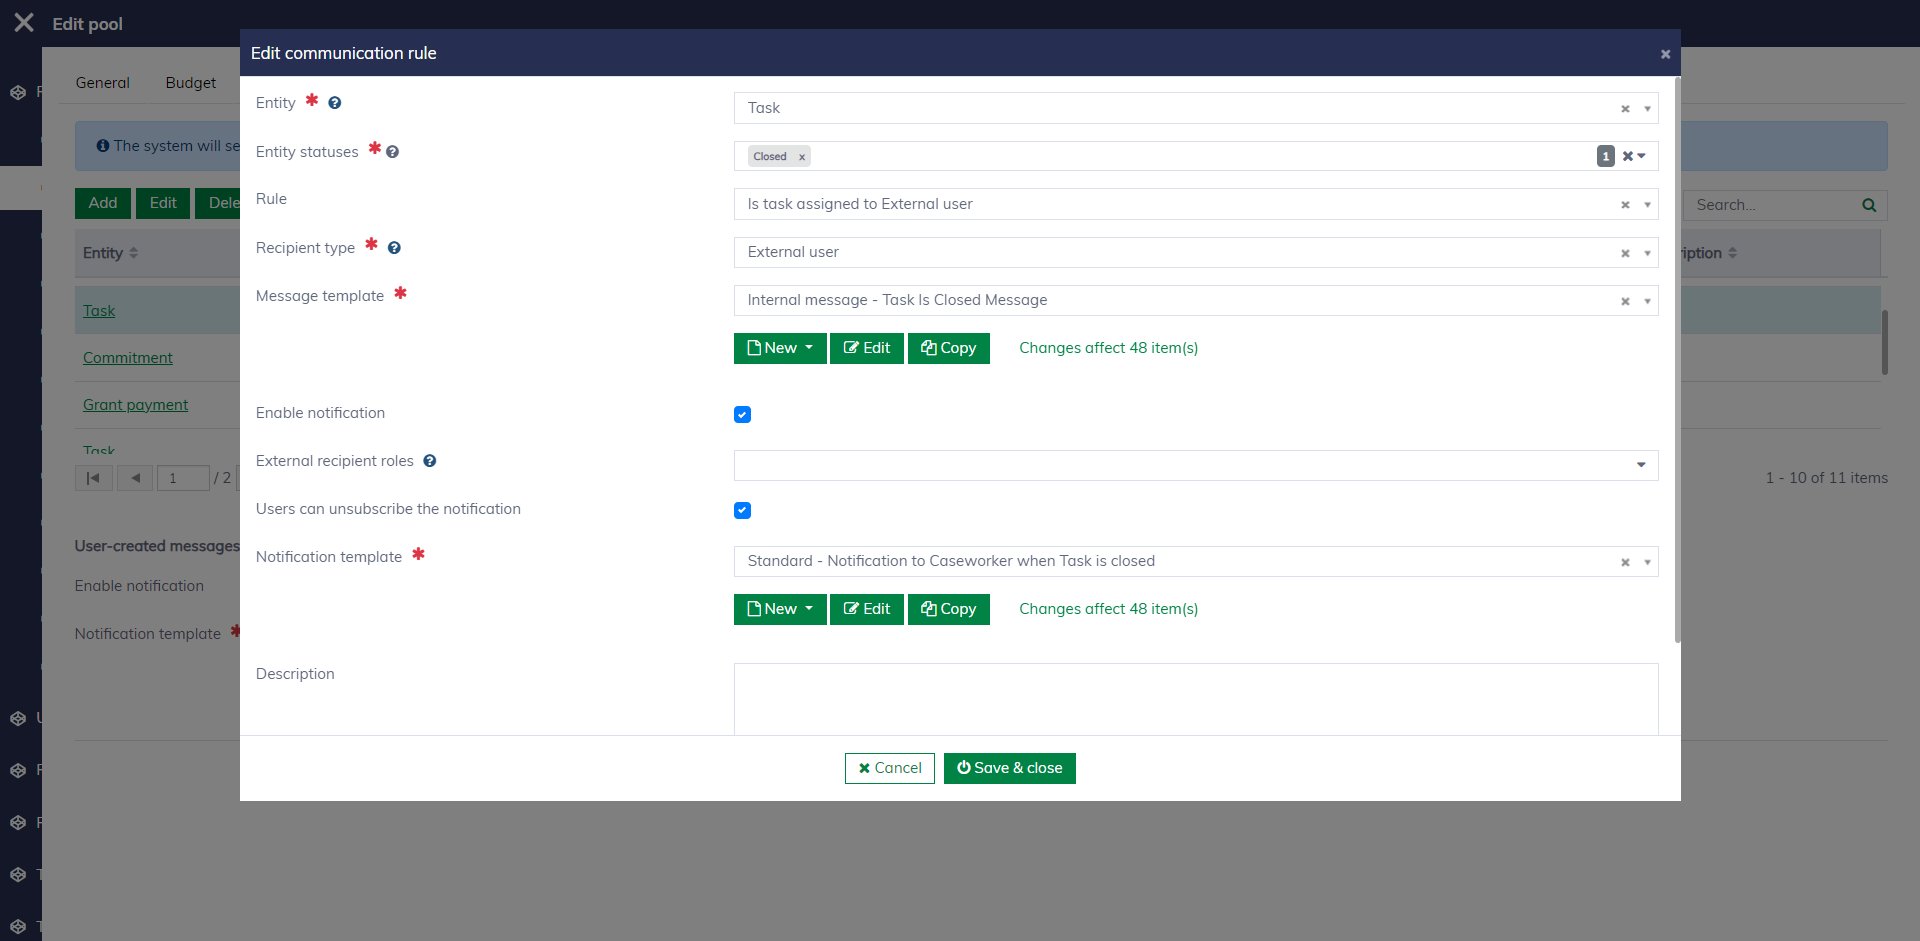
A communication rule has the following fields:
| Field name | Mandatory | Description |
|---|---|---|
| Entity | Yes | To specify the data entity type that triggers the communication, such as Application, Payment, Task, etc. |
| Entity statuses | Yes | To specify the entity statuses that trigger the communication. For example, you can configure to send a message to the caseworker when an application is submitted. |
| Rule | No | To finely control when to trigger the communication. Learn more about rules here. For example, you can configure it to send a message to caseworkers when an application with a total amount greater than $5000 is submitted. |
| Recipient type | Yes | To determine the recipient, whether they are internal users or external users. Different types of recipients require different setups. |
| Message template | Yes | The template contains merge fields to generate the message content. Learn more about message templates here. |
| Enable notification | Yes | The system supports various types of notifications to help users stay informed about new messages. |
| Recipient roles | No | The system will notify the assigned roles in the case. If none are selected, the system will notify all users assigned to the case. |
| Users can unsubscribe the notification | No | If checked, users have the option to not subscribe to the notification. |
| Notification template | Yes | The template contains merge fields to generate the notification content. Learn more about notification templates here. |
| Description | No | To explain more about the communication rule. |
| Is active | No | To determine if the rule is enabled or not. |
It's also possible to configure notifications for messages created and sent by users. You can check "Enable notification" and then select the notification template.

Other rules
Auto-close rules
It's possible to set up rules on the pools to automatically close applications if they meet specific conditions. For example, you can configure a rule to close all applications refused in the pools after the refusals are informed.
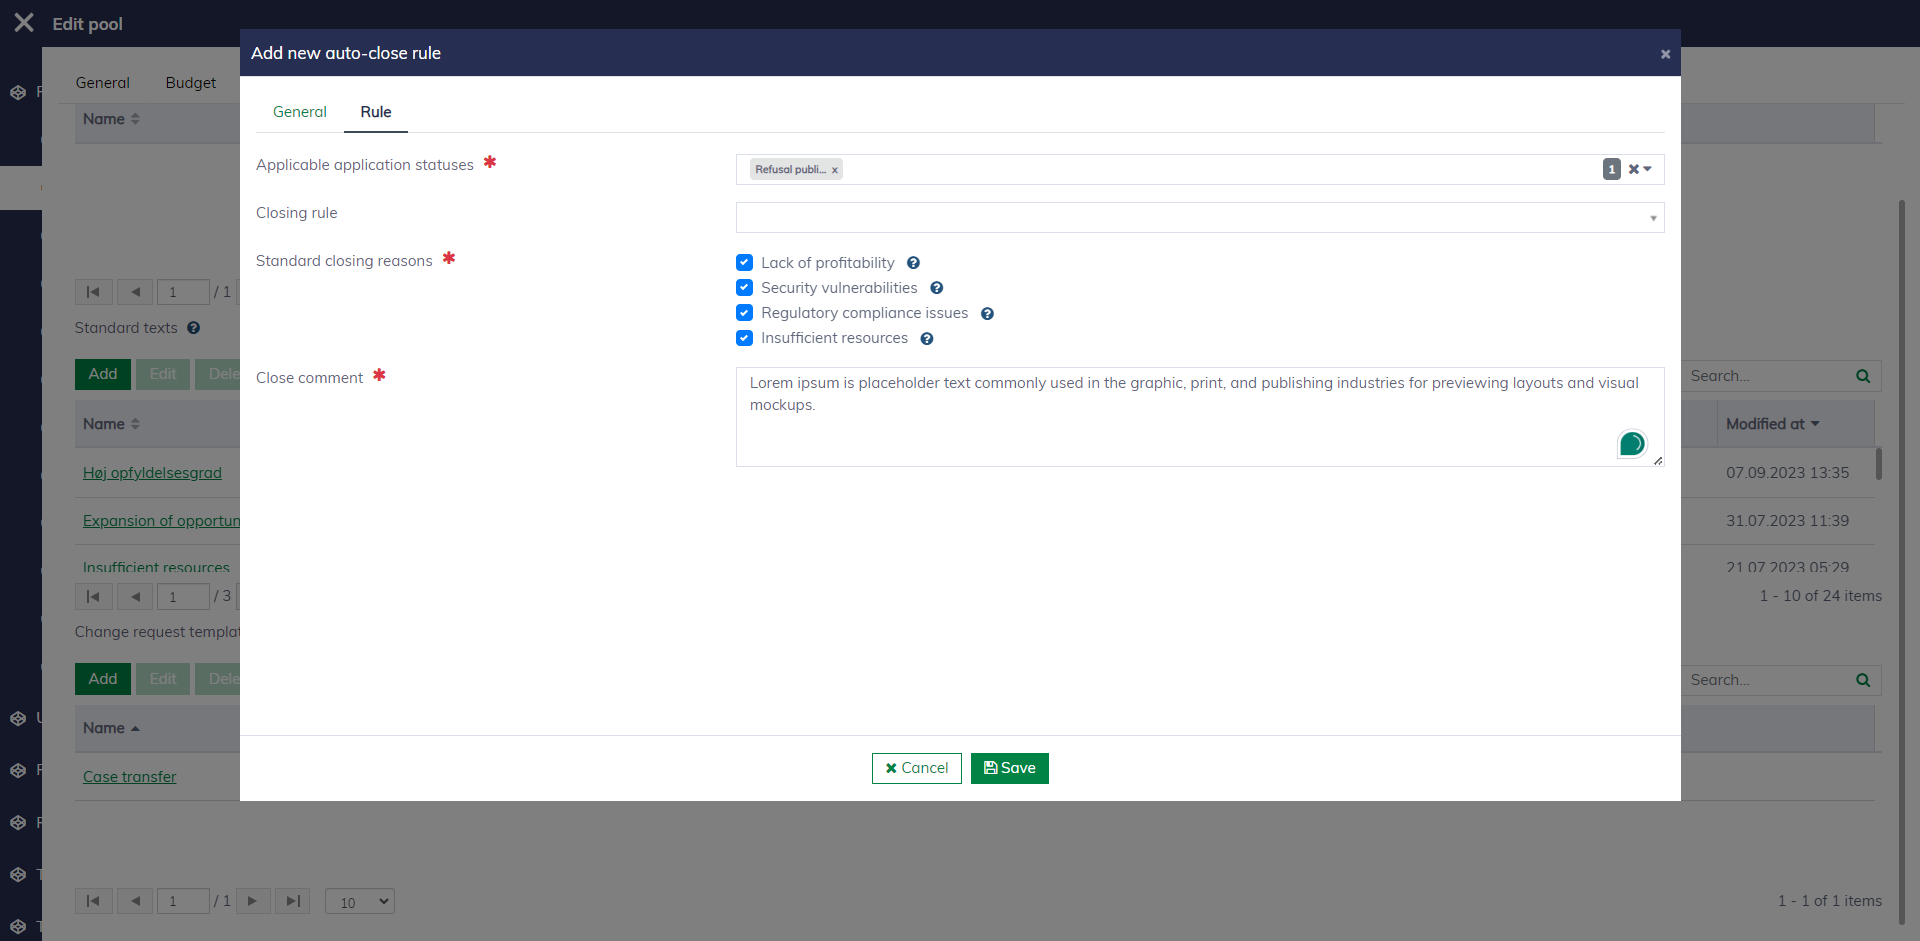
An auto-close rule has the following fields:
| Field name | Mandatory | Description |
|---|---|---|
| Name | Yes | The name of the rule. |
| Active | No | To determine if the rule is enabled or not. |
| Description | No | To explain more about the communication rule. |
| Applicable application statuses | Yes | To specify the application statuses that can be automatically closed. |
| Closing rule | No | To finely control when the application can be closed. Learn more about rules here. |
| Standard closing reasons | Yes | To select the reasons for closing the applications. The reasons are predefined in the "Standard texts" setting. |
| Close comment | Yes | A comment to caseworkers explaining why or how the application is closed. |
Standard texts
You can preconfigure texts for different purposes that can be used across the system, such as reasons for rejecting an application.
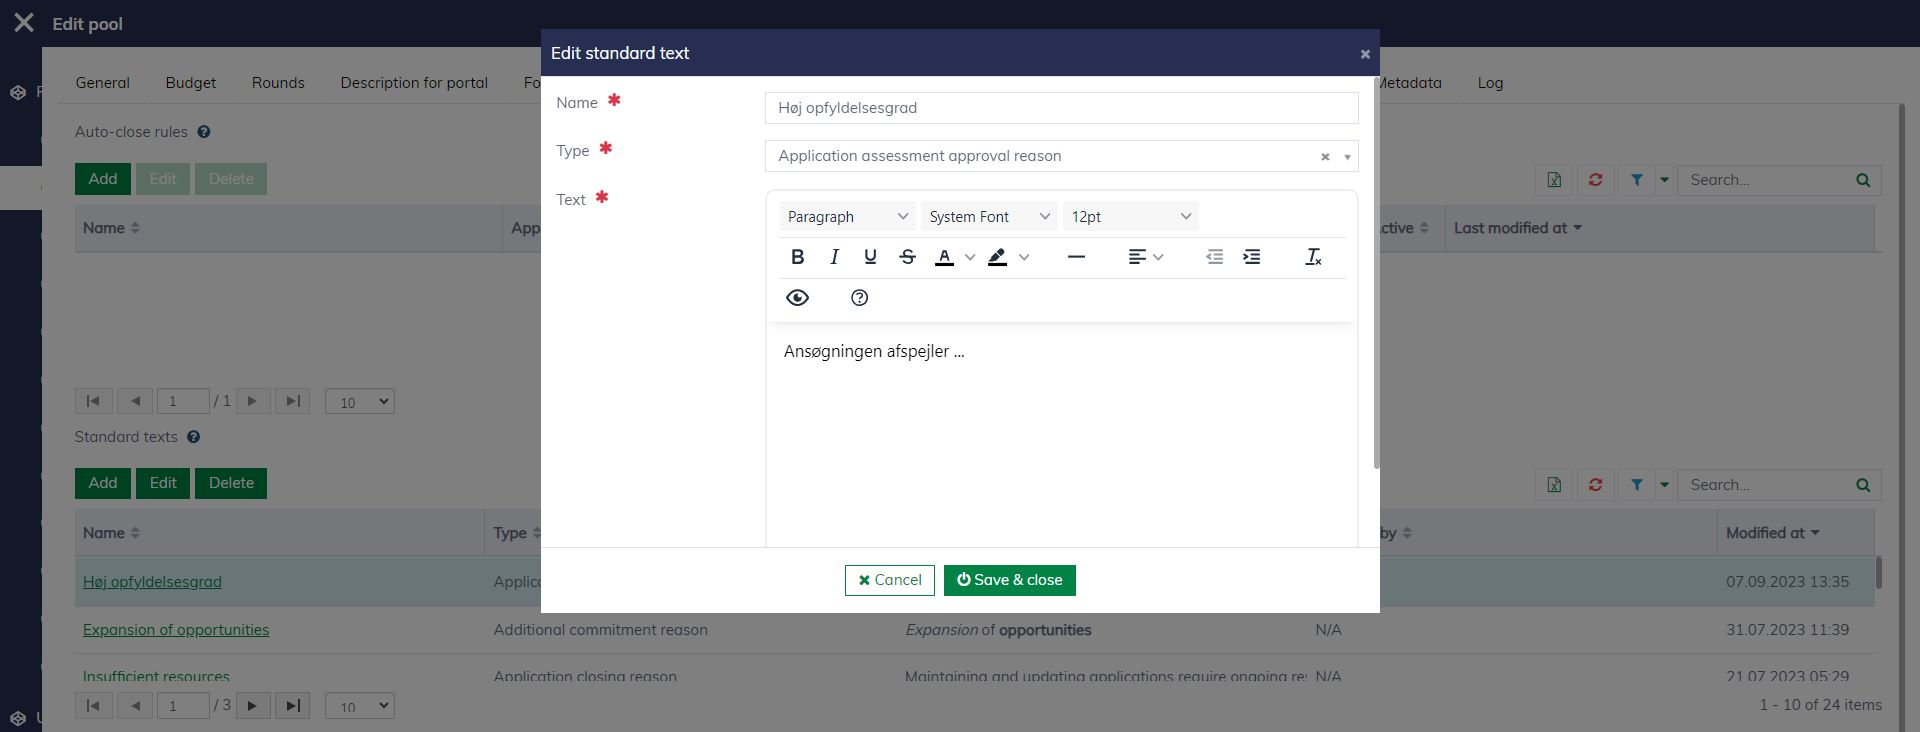
The system currently supports the following standard text types:
| Standard text type | Description |
|---|---|
| Application assessment approval reason | To explain the assessment decision for why an application is approved. |
| Application assessment refusal reason | To explain the assessment decision for why an application is refused. |
| Report rejection reason | To explain the assessment decision for why a report is rejected. |
| Report reopen reason | To explain the assessment decision for why a report is reopened. |
| Commitment cancellation reason | To explain the decision for why a commitment is canceled. |
| Additional commitment reason | To explain the reasons why an additional commitment is needed. |
| Invoice reason | To explain the reasons why an invoice is needed. |
| Application closing reason | To explain the decision why an application is closed. |
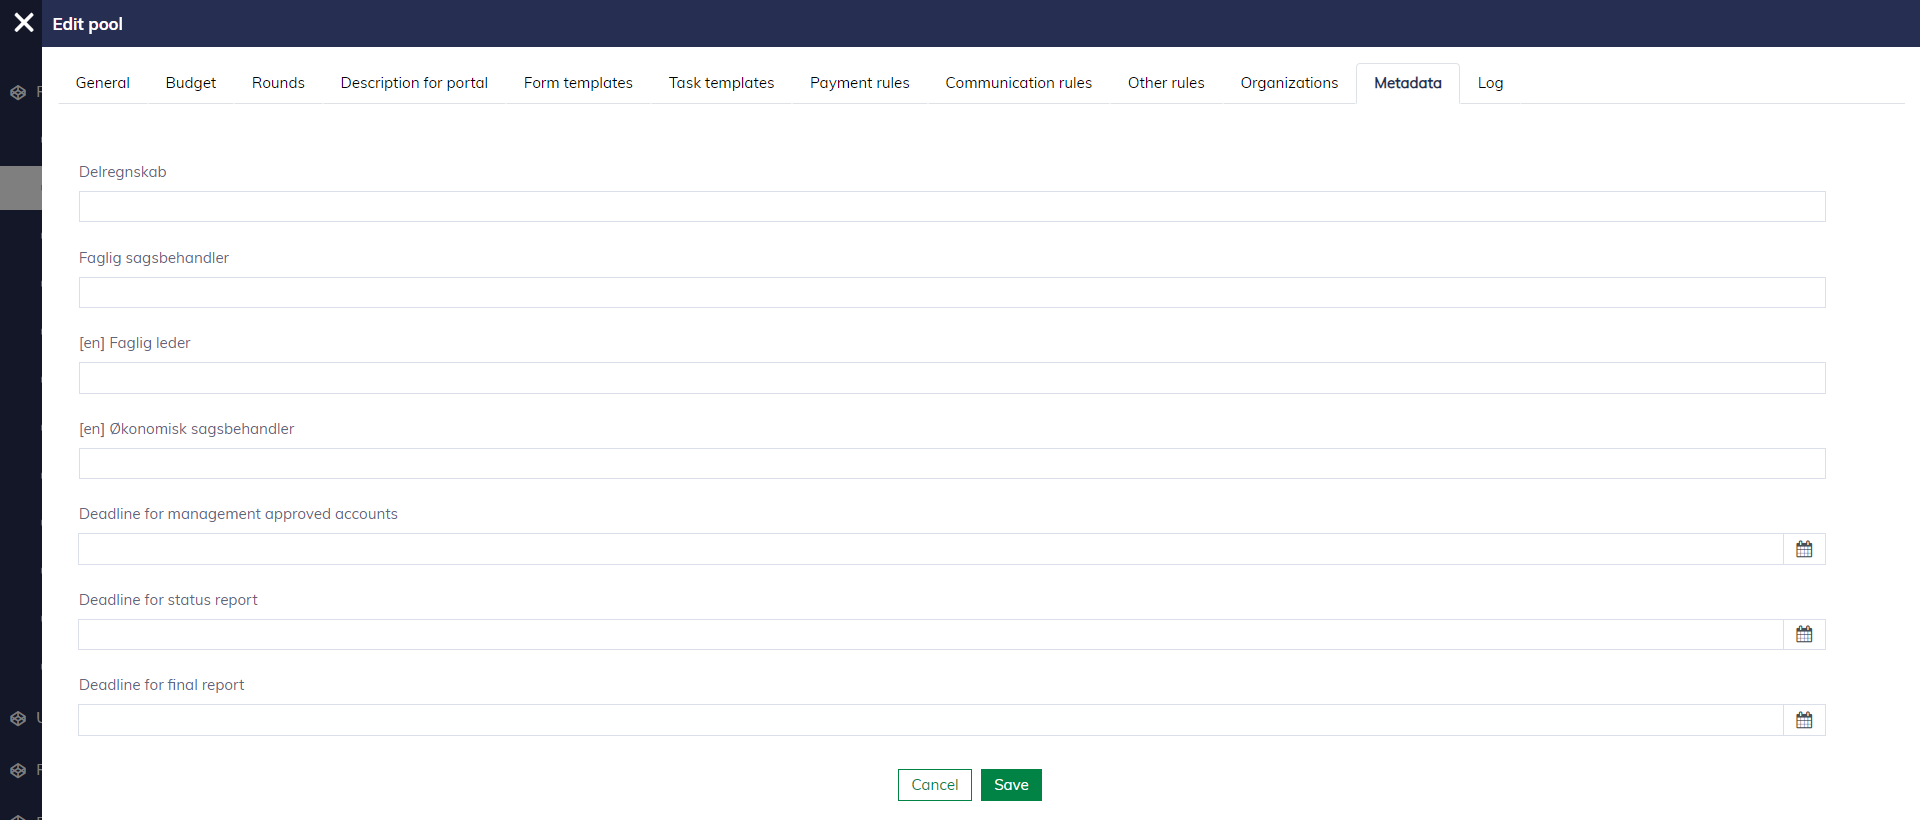
Metadata
If your business requires more information at the pool level, you can define custom fields for pools. The custom fields will appear under the "Metadata" tab for user input. Learn more here.
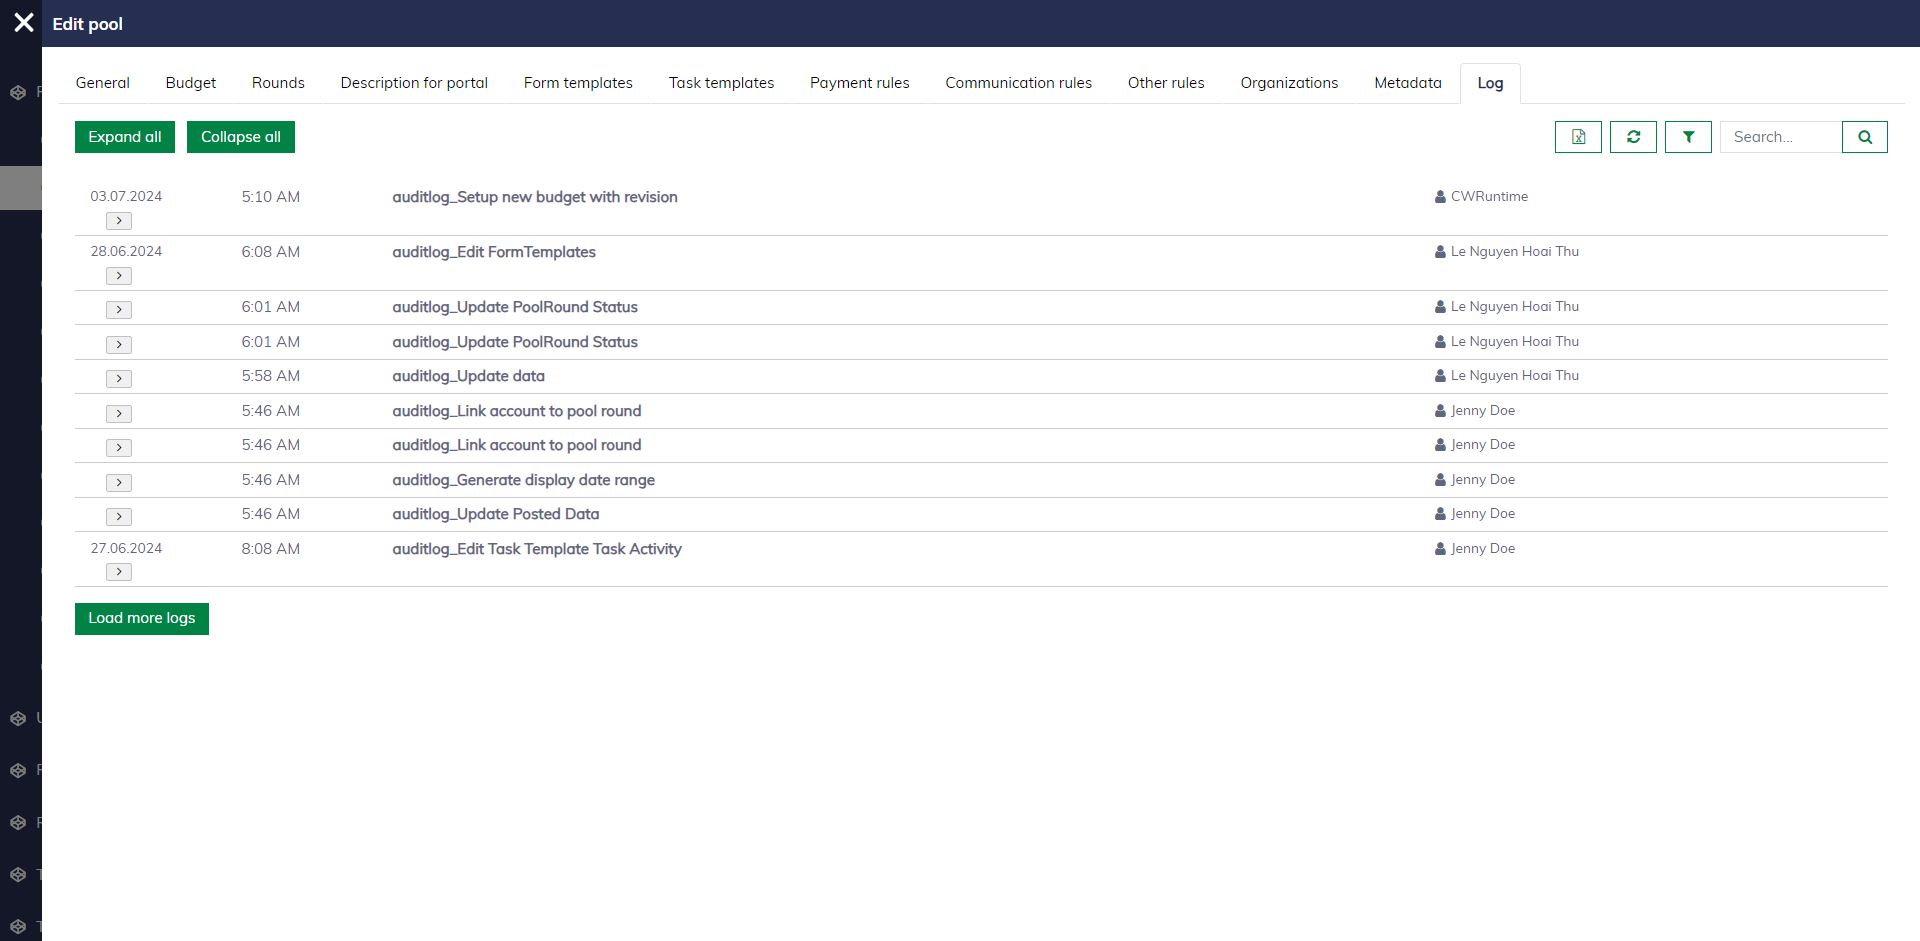
Log
You can view the history of a pool by opening the pool and navigating to the "Log" tab.